Thursday, December 30, 2010

Divine Noel Swirlydoos Butterfly Challenge

Angelica is hosting another butterfly challenge over at
I have not done many layouts this month...well..actually only one.  So this morning I got up and realized that this challenge ends today!  So I made a layout.  The real challenge is this is the 
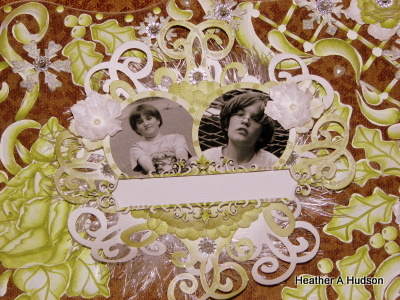
Christmas photo of the boys I took this year.
The boys all received these awesome hats and spelunking flashlights (that is what the boys called them).  So they immediately became Ninjas. Nothing says Christmas like Ninjas.
Okay...so I designed a filigree butterfly with my Silhouette SD.
I had fun with this...and put the letter "H" in each of the wings for "Heather."  I used Gold Tinsel embossing powder by Stamp-n-stuff. I used a sheet of my Divine Noel kit for the background of the butterfly.  I stamped it with Ranger's Distress inks in Vintage Photo..and inked the edges.

I did my layout a little different by using a sheet of cheaper paper to place my papers on.  That way they look layered..but I didn't have to use much paper.
The First strip to the right...stamped with Vintage photo and distressed with my craft knife..and inked.
Here I added the second strip..it was embossed with the same gold color as above.  I got the embossing powder at Michaels craft store.
Here you can see where I used One of Martha Stewart's Punches to add 2 more layers..one in cream..and one in green (to the left).  I cut out the frame of one of the pieces of paper from my kit.
Here is the paper I will use as my background...I will cut it down to size..so it will fit right on top of the pink paper.


I added the black punched piece to the bottom of the paper...and goofed on another black punched piece ....but decided to use it to cover up the lower right corner.
Wow!  Wasn't that fast...lol.  This is the finished piece.
Here are some close ups below.
Upper left corner...added another one of those goofed up punched pieces in black...and added some of the tiny bird and holly embellies too.
Here is the upper Right.  I took the twig of berries apart, and just glued little clumps here and there.  The leaf was a larger leaf that I cut down to the size I wanted.  The Red petal came from the large poinsettia flower in the kit...I just took the whole thing apart.
The trim and stick pin are also from the kit.
Here you can see one of the punched strips in green, some of the green pearls from my kit ..and how I embossed the dusty attic piece with gold tinsel.  I then added a green jewel and pearls to give it more dimension.
Here is the top center of the page.  I used another punched piece around the center photo...and embossed the black mat as previously done with other pieces.  The photo acts like a pocket to hold the tag...and the butterfly acts like a pocket to hold the photo.  So I could change it, if I wanted.
Here is a black flower, more leaves and petals that I took apart to form my lower right hand cluster.  I used another 
piece that I embossed in gold tinsel.
Here is a close up of the butterfly.  I used one of the flower pieces as part of the decoration for the butterfly.  I also used two of the poinsettia petals to add dimension to the wings.  It is hard to see, but I used part of a Dusty Attic piece for the added dimension for the body.  It too was embossed with Gold tinsel.
 One last butterfly close up.
Here you can see the hidden tag.
Thanks for visiting!
Hope this inspires you to create something beautiful today!
Hugs!

Wednesday, December 29, 2010

Winter White Layout Finally Finished!


Well I finally had some time to work on my Winter White Acrylic Layout.  Here it is so far....
I did do some letters for the Dusty Attics piece..but my DH moved all my scrapbook stuff to a new area for me..and I have yet to figure out where they are.
I will have to get some more photos...as it was dark when I took these and the flash washes everything out.
The idea behind Lisa's Challenge was that we needed to have a Winter White Layout plus one color and we had to use summer photos.  Here is my Gabe on the green machine and Caleb sitting in the Hammock.
I made all the flowers out of plain white cardstock that I painted with avocado...or inked with peeled paint.  
If you are interested in seeing the sketch of this before I painted it on the acrylic....just follow the link below for the first steps.
Thanks for visiting!

Tuesday, December 28, 2010

Valentine's Day Tag Ornie

This morning I got up...and did a little sketching on some scrap paper of a Valentine's Day Tag I wanted to do. 
Here it is.. 
Of course I have it displayed on my Pink Christmas tree.

I started out with a plain piece of cardboard from one of the many 
boxes that I collected this past Holiday.  I simply painted it using Delta Ceramcoat paint in "Lisa Pink."  I then used my 
to distress the edges of the heart.  
I used my favorite background stamp with Stazon:  Jet Black ink.
I used some Maya Road chipboard pieces.  I embossed one piece with gold embossing powder...and the Bird shape I painted in the same manner as the heart.  I did ink around the edges with Ranger's distress inks in Vintage Photo.
I used resist paper for the "love" sentiment..that was a left over scrap from one of my other projects.
Thanks for visiting today!

Hope this encourages you to get creative today!
Hugs!

Tuesday, December 21, 2010

365 Cards Day Challenge: 294

Sunday when I saw Pam's Sketch 
I knew it would be perfect for a few cards I needed to make.

About a month ago I had a "friend" on FB contact me and send me a link to her story on 
It is a site that you might want to check out.  Sometimes people wish for cards to cheer up a loved one, etc.
Honestly, I get a lot of friend requests through FB from people I don't actually know.  I just can't say no--unless I have no idea of who they are.  This girl graduated with my younger brother, so he knew her.  
So I made these three cards using the sketch--only two are shown because I did both the boys the same).  
This is the inside of the card.  I signed my kids names on it.  
So hopefully they will like the cards.  I dressed up the envelopes a little so they would be more festive.
I will send them each their own card and even if they don't like the card at least they WILL like what is in it...LOL.  Kids, you got to love them!  Two are teenage boys and one Girl.

Thanks for visiting today!
Hugs!

Monday, December 20, 2010

365 Cards Day 292

This is the last card...at the last minute...lol
Is the challenge at 365 Cards.
Here is my card
I used a cake, birthday hat and streamers...and birthday gift as my images.  I even used up the rest of my scraps from the "Feeling Scrappy" post I did earlier.
Thanks for visiting!
Hugs!

365 Cards Day 293

Quick post..because I still have one more card to make for this week!
Is the name of the Challenge over at 365 Cards for day 293.  You have to use 7 scraps of paper on your card.
I used 7 scraps from a cute mini album card I did for a friend of mine.
This is what I think of as "Cutesy"
It is nice and bright..and has a big yellow flower on it!
Thanks for visiting!
Hugs!

Check out my Holiday Spirit Contest by clicking on the Holly in the Upper Left column.

365 Cards Day 290 Touchy Feely

Okay...so earlier today I warned you that lately I had been playing with my paints and brushes.  Below is a project that I have been working on for my DM for Christmas.  
I was inspired by two challenges on this one....
and another Winter White challenge.  The Winter White challenge you may only use White and one other color...and it can't be black.  If you use acrylic..you get an extra point.
So...it is not a card...it will be a wall hanging layout.  It is hard to tell, but it is a piece of acrylic...and I have it sitting on the back of a pad of paper...so it will show up.
I just have to get ink for my printer so I can get my photo of the boys.
Okay...I sketched out the drawing on Thursday...I think.  Started painting it...and then began to make some flowers.  I used my Big Shot to emboss the center piece...I used glitter on my flowers...and I have some white fibers....not quite lace or fabric...but it starts with an "F"...lol.
I will print out their names...and photos once I get that "whatever color" my printer thinks it needs to have...lol.  You can kind of see the embossing on the center piece.  Everything else is just paint.  I have a few layers on there...so it too has some texture to it.
Here is a close up of one of the flowers.  I painted the edges of it...and the holly leaves...and painted in the veins too.  You can see the glitter on the flowers.
Okay...so that is it...
Just call me a RULE BREAKER...LOL...but honestly I don't play to win anything...I just like to be inspired...and hope to inspire you!
Thanks for visiting!
Hugs!

365 Cards Day 291

The challenge over at 365 Cards 
I kind of lucked out on this challenge..in that I like to add
detachable ornies to most of my cards.  That is pretty much 
because I am a nut about Christmas trees.

Here is my Card for my Mom's gift this year.
I did use two mini paper bags as the base for this card.
Okay...so all the images for this card I designed myself using an online painting / editing program called GIMP.  I then used my Silhouette SD's print and cut feature to cut out all the elements.  My ornie is the snowflake with the candy and holly on it.  It slides into the front of the card.
I used gold bead wire to form the hanger.  I stamped a nice Holiday Greeting on the front.  You can't tell in the picture...but the green paper that forms the front pocket has been embossed with a holly plate...in my Big Shot.
Inside are two tags...one for a picture of each of my boys...and the other side is for journaling.  So they can write something nice to their Grandma.
Here is a photo of one of the journaling sides...and the side that holds the photo.  
All images Copyright by Heather A Hudson.
Thanks for visiting!
Hugs!

365 Cards Day 287


Okay..so today I took my DM to the Antique store...I found some Great vintage beaded ornies!  We had a great time!
This is the card that I made for 
over at 365 cards.
I will have to warn you...I have been fooling around with my paints lately....so this is a simple take on the sketch that I made to give as part of my MIL's Christmas gift.  She is really Artsy...and loves to write letters to her family.
I used a piece of paper from the "Susan Winget" pad of paper by
 K & Company.  I used a script liner brush with Delta Ceramcoat in Avocado to free hand some "wavy" lines.  I then used a filbert or cats tongue (named that because that is what the shape looks like)..to make simple leaves.  Used the liner again...with watered down avocado to do the swirly q's.  
I added some vines on the inside...so it wouldn't look so bare...but she would still have room to write.  Of course since I liked the way this turned out...I happily signed the back.
Thanks for visiting!
Hugs!   

Sunday, December 19, 2010

365 Cards Day 288


So this card I used Paper that I felt would be suitable for a "Guy"...and personally...I just don't get into it...but it was in the pad..so I decided to use it.  This is for the
For the tree, I used my silhouette SD to make a tree shape out of lines.  I then used 4 fonts for the words.  I found the outline of the fonts with the Robo Master program...and welded it with the tree outline.  Then I  used the Silhouette SD's "print and cut" feature for the tree.  I stamped and inked the tree with Ranger's Peeled paint distress ink.  I distressed the edges with my craft knife and inked them with Vintage photo.  I used some pearls that are a bronze color to accent the edges of the red square.  I used a yellowish colored gem for my Christmas star at the top.  The base of the tree I just distressed with the Vintage photo.  I added Distress Stickles in Peeled Paint to the tree.
That is it!  Simple...and done!
Thanks for visiting!
hugs!

365 Cards Day 289

If you are looking for

On to my Post for the day...

I finally felt as though I got enough cleaning done that I should be allowed to do a little playing with paper.
was the challenge for day 289 over at 365 cards.  
Here is what I came up with....I am trying to keep it simple and so it will fit in the envelopes I have...so I can mail it easily.
For my two windows I chose Christmas Holly.  Specifically the ones I created myself.  So the die cut is on the inside..but when the card is closed...you think they are on the outside...too fun!  I inked the edges with Ranger's distress inks in Peeled paint and Vintage Photo.  The stamping was done in Peeled paint.  The sentiments...I did on my Silhouette SD along with the Holly by using the "Print and Cut Feature".  If you didn't already know...I love that Machine!
Here is a shot of the inside.
I love how this turned out...not to fancy...yet not to plain. 
Thanks for visiting!
Hugs!

Saturday, December 18, 2010

White on Acrylic

Last night when I got home from work, I decided to work a little more on Lisa Nova's Challenge over at Swirlydoos.
You can hit the swirldoos blinkie to the left to check out the site.


I was super excited to see that over at 
Clear Scraps Blog
That they are having a give away of some awesome acrylic pieces.  One is like the type I used below...so of course I am following...and blogging...and FBing...because who DOESN'T want some awesome free acrylic shapes?  They also have great inspirational pieces that you can look at for ideas!  So check them out!
Here is a close up below
When I get an opportunity to work on this some more...I will post the update.
Thanks for visiting!
Remember to Click on the Christmas Holly in the upper Left side of my blog...for a chance to win an RAK from me.
*hugs*

Friday, December 17, 2010


If you are looking for the 
"Heather's Holiday Spirit Contest"  just click the picture 
of Christmas holly at the top of my left column.  I will be do doing a drawing in January...and you could win a RAK from me.


Okay...so I did take a couple more photos of the trees in progress.  The light just doesn't seem to want to cooperate.
So...so far I have 7 trees done...I might just be calling it quits...LOL.  My urge for creating...and participating in challenges seems more alluring at the moment.
This is my pink tree which I have in one of the corners of my dining room.  I will be having everyone over for Dinner on Christmas...so by then everything should be clean...and I can get some better photos...lol.  The blue doesn't look all that great in the photos.
This is a 9ft slim tree which I have in the opposite corner of the pink tree (which I think is a 6 foot tree..not sure).  The angels that I have on top of these trees....came from and ebay purchase....I got a ton of pink and red ornies for less than the original price of one of the angels.  They were from Dillards.
This is a small tree sitting on one of my free desks that a friend dropped off...she didn't want it anymore...so it got a coat of paint...and now it sits happy in the foyer.  Holding all my old PTO stuff.
As my life goes...the lower half of the tree lights don't want to work.  They were all burnt out.  So I had to remove all the ornies...lol...and I just figured...I will get a shot anyways...lol.  I have my favorite "silicone Flame" covers on some of the lights.  They give the tree a great vintage feel.
I think of the tree below as my "Henry Ford Village" tree.  I have 6 blown glass ornies from there on this tree...along with ornies that close friends have made for me...or I have purchased from fellow artists that I love off ebay or etsy.
This is a 9ft tree...that is vintage in that it kind of looks like a bunch of pipe cleaners.  I bought it from a primitive store online.  I love it. Light and airy....bummer...you have to add lights to it...and I am not an adding lights kind of person (although I did).