Tuesday, February 28, 2012

Gecko Galz Shabby Spring in Paris Card

Hello Friends!!
I am so happy to have a chance to create today!
Not that I didn't create yesterday, or on Sunday.  Today I was finally able to get things printed and cut out.  
Nothing worse than spending time creating a beautiful hybrid card digitally, only to have your printer say...
"Sorry Miss Heather...not today"
I was trying to print from Inkscape.  What a nightmare..LOL.
Finally my DH was home..and being the Technical Genius that he is
he was able to fix my problem.  Imagine for two days, working on projects....and NOT being able to get them to print..or when they DID print...the cut lines were off when cutting!
So...today is a happy day!!
I actually was able to put my digital images on paper!
I did some distressing some inking, and a little twisting!

Let me say that I started this digitally yesterday morning after visiting the Shabby Tea Room to get inspired.  Pop on over there to see the inspiration by the DT.  
This is the inspiration Photo below
  I am so lucky because I found a new place to play...that will be right up my alley! The blog is called Sugar Creek Hollow.  I just love VINTAGE..and PRIM...this week their challenge is to use what ever photo you like..to inspire a vintage creation :0).  
Here is what I came up with.
I love it!!
Let me say that I started this digitally yesterday morning after visiting the Shabby Tea Room to get inspired.  Pop on over there to see the inspiration by the DT.  
This darling little girl in her rain coat with the jump rope is part of one of the new sets of March Gecko Galz Ephemera.  The Vintage white frame is from a Gecko Galz collection. The forget me nots are one of my favorite go to images from the Graphics fairy!  The Eiffel tower I found as free clipart online.  I just changed it a tad.  The Shutters are digital stamps (also from Gecko Galz).  The gorgeous ivory mulberry roses and vintage champagne colored flatback pearls are from Esmeralda's Pro 31 Designs Etsy shop.
The lace is one from my stash.  
Used a vintage button, some May Arts Trim and a Ideology Clear fragment from Tim Holtz (Ranger).  I will be entering this into Sandi's challenge at the Flying Unicorn.  
Of course..you know I love a hidden tag :0)  just wouldn't be my creation with out one!  I used pop dots on the upper flowers on this darling little tag.
Here is the back of the tag!
I used Ranger's Distress ink in vintage photo on all of my pieces.  I created the beige and white polka dot paper myself in GIMP as well as the plain blue paper (I used the eye dropper tool to get one of the shades of navy from the forget me nots).
Thank you for visiting me today!
Hugs!
Heather

Saturday, February 25, 2012

Pink Saturday New Blog Background and Header

Hello Friends!!
Today I just wanted to share with you and all the fans of pink 
at 
my new Blog Background and Blog Header that I designed 
today!
I had a really fun time creating it!
I used Graphic Fairy Images and some I made myself!
I used GIMP to create my blog backgrounds.  It is a free online program.  You can learn more about it by watching some of my tutorials.

Thank you for visiting!!
Hugs!
Be sure to check out the Pink Saturdays Blog.

Monday, February 20, 2012

Guest Designer for The Shabby Tea Room Week #102 "High tea"

Hello Friends!!
  I am so excited to share with you that I am a Guest Designer for the Shabby Tea Room.
This weeks Challenge is fabulous!
"High Tea" 
Our creations can be a card or project that is inspired by the photo below, the colors from the photo and a doily. 
Isn't this teacup just divine??  I would love to have a set of these!  Lucky for me..these are some of my favorite colors, so it was easy for me to come up with a project.
I created a Shabby Tea Cup table place card / gift card.
I painted the tea cup in GIMP and added lots of digital flowers from both the Graphic's Fairy and Gecko Galz ( I use GIMP to take the parts of images I want to play with..so it could be just a leaf..or rose bud from the original).  The little girl holding the bunny is from the Bunny Trail Gecko Galz digi stamp set.
My tea cup sits upright, and you can see that I have my own name on it :0)  I can imagine how beautiful it would be to have a table with these set on it..and all my girlfriends names!
Here is my teacup with the goodies removed.
I folded up my doily after inking it with Ranger's old Paper distress ink, and created a little tea bag (one of my best online buddies Carol gave me the loose leaf tea).  The tea bag is attached by an oh so shabby pink iridescent pearl strand to the little Tag.  The tag says "The Shabby Tea Room"..and reminds me of a delicious cup cake.
 Here is another angle
In this photo you can see how I used my perfect medium pen and added perfect pearls in perfect gold.  There are two bookmarks.  One that says..."Come have tea with me in the"  Then you see the little cupcake that says..."The Shabby Tea Room."  I found a picture of a vintage spoon online, used GIMP to clean it up and Inkscape to create a cutting file so I could cut it out with my Black Cat Cougar.
I added the "Spoonful of Sugar" to the spoon.  I figure it could be used as a bookmark.
All my Pink and  Ivory Mulberry Roses, Porcelain Roses, flatback pearls (pink) and leaves as well as pearl sprays came from Pro 31 Designs.
One last photo of the completed Tea cup with goodies inside.
I sure hope that you come and join us in the tea room this week!
I can't wait to see your creations!!  
Make sure to check out the Shabby girls creations, they will inspire you too!!
Photobucket

Sunday, February 19, 2012

Shabby Tea Room "Hi Ho Cherry O Challenge"

Hello Friends!!
I would like to share with you today a Recipe Pocket that I created
I created this Cherry Recipe Pocket specifically for the
Shabby Tea Room week 101 
Hi Ho Cherry O Challenge
Here is the inspiration photo

Lucky for me, it is "Anything Goes at Simon Says Stamp and Show"
so I am sharing this creation there too!!
I will have to say I designed the pocket and created the template earlier this week, and finally was able to figure out the cut setting of my new Black Cat Cougar (I am getting there..lol).  
It is oh so shabby..and sweet as can be.
I used the Gecko Galz Digi Papers 
Which I thought were perfect for the Cherry theme.
I don't even like Cherry pie..LOL..(but I did eat it, to be polite).
I used some Red blingy bling from Pro 31 Designs.
I also used some Pearl sprays, red ribbon, flatback pearls, mulbery paper roses and porcelain rosesI also used my perfect medium pen and perfect pearls in perfect gold.  
Here is the recipe card.  One side says Ingredients...and the other side says Directions.  I added two blingy blings in red to the little cherries on both sides.
Here you can see that I used three different paper from the Gecko Galz digi pack.  I also used the Cherries from Gecko Galz too.  I used GIMP (to create the center collage on the front), and Inkscape to create my template and apply my digi papers to.  Then used my Black Cat Cougar to cut them out.
Here is a picture of my file.
Here is a picture of the tags alone.  I used my crop o dile to cut my hole for the ribbon and to set my grommet.
Back
Here is the back of my Cherry Recipe Pocket.
It says...Ooh so Cherry!
Too bad I don't like Cherry Pie..or I would of wrote a recipe on this...lol.  Here is a close up of the top of the back.  I have this thing about the back looking almost as good as the front.
Thank goodness I was able to get this finally cut out.  I believe I had at least 7 copies that I tried to cut before I got it right...LOL.


I did have a few pieces that survived my not so great cutting techniques today.  So I was able to create another Cherry Pocket..this one with a tag.
I used one of Tim's fragments on this one.  With a tiny picture of cherries :0)  So shabby yummy!!  This one I will be sharing over at the Flying Unicorn for Sandi's Challenge.
I just love all the embellies..and the digi papers!! 
These are some of my favorite pieces...because they are
the colors I LOVE.
Photobucket


Friday, February 10, 2012

Valentine Heart Card (Pro 31 Designs & Gecko Galz)

Hello Friends, I hope you are having a fabulous day!

Today I would like to share with you a Valentines Day Heart Card that I created.
I started off by creating a template for the card in Inkscape.  I then used the digital paper that I created, and some of the images from the Valentine Mini album I designed below.
Here is a picture of the pieces I cut out with my new Black Cat Cougar, edges slightly distressed...and inked with  Worn Lipstick distress ink by Ranger.
The rose is one I painted in GIMP and then used to design the digi paper I used for the hearts.  The Cherub is part of a Gecko Galz image from this month's collection.    
I should also say that I will be sharing this with the ABC Design Team Challenge and Simon says Stamp and show (wings and buttons).  The main reason I started this card was because of Frank's challenge over at the Flying Unicorn (9 hearts in your project).  I am also Sharing with Inspirational Journal (add a heart).  I will also be linking up to Pink Saturday.  This week I will be sharing at 4 Crafty Chicks as well.  
Here I have started to glue pieces down.  Esmeralda of Pro 31 Designs sent me some Design Team goodies..and I used some of them below.  I love the red lace/ribbon trim!!  It followed the shape of my heart easily.  I created another heart shape using some clear colored pearls.  I placed the Gecko Galz image in the center.
(sorry about all the glue tendrils)
Next I used my hot glue gun and added some curly roses that came in my Pro 31 Design Team kit.  I LOVE them!!  The rosebuds came from an RAK that I won at the Flying Unicorn.  The vintage buttons  I bought on one of my trips to the antique store.
How about a look at the inside :0)
I used some of the red blingy mesh to go around my hearts, I will say this looks super fabulous IRL.  You don't quite get the full effect of the bling.  I used a digital "Love" stamp when creating my background paper.  See those little hearts with the rosebuds and antique buttons???  They are hidden tags!!  To write some love notes on of course!!
Here is a photo with them taken out.
They look the same on the reverse side (minus the rose and button) You can see here how I used two pieces of some pale pink flatback pearl trim for the button flower centers.  These came from Pro 31 Designs as well.  Here is the back of the card.
I used more of the red trim, some pale pink flat back pearl trim, Large curly roses..and small roses all from Pro 31 Designs.  The Heart collage in the center is one I created myself.  The key and red hearts with flowers are Gecko Galz images that I incorporated into it.
I hope to have some time next week to do a video.

Photobucket


Tuesday, February 07, 2012

Vintage Romantic LOVE Mini ALbum

Hello Friends, I hope you are having a fabulous day!
Today I would like to share with you a 
Vintage Romantic Love Mini Album that I designed
using some Gecko Galz, Graphic Fairy and images and digital papers that I created myself.
I am sharing this with the Inspiration Journal (add a heart to your project...and I have a lot of hearts..LOL)
Here is the cover.
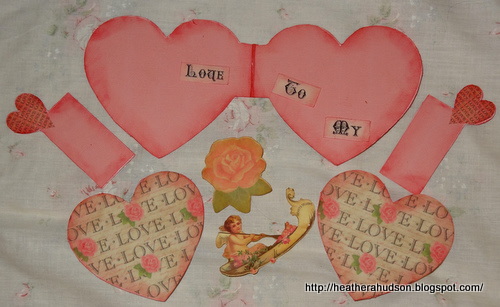
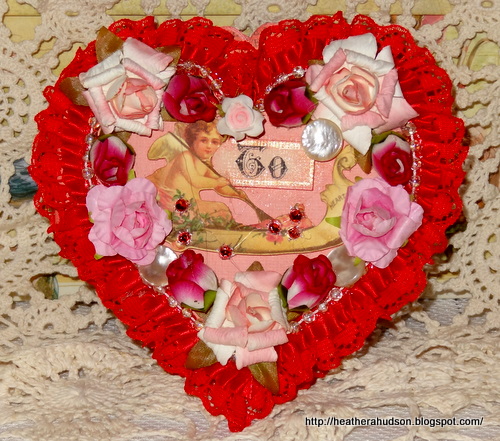
The cute little cherub in the boat is part of a vintage ephemera image from Gecko Galz.  I just did a few little changes to it and used pop dots to add a little depth to the cover.  The gorgeous Ivory Mulberry roses, teardrop beaded trim, clear crystal flower and Cranberry Rosette (upper left) are all from Esmeralda's Etsy shop PRO 31 Designs.  Just a note I should be getting my next DT package soon, and I will be having a GIVEAWAY on my YOUTUBE channel.  So check back..you won't want to miss it!
Here is a close up of the flowers...
 Yummy!!  I just love Romantic Vintage Style!  The Background paper of through out this mini album is a digital paper that I created using different brushes, and layers and colors as well as part of a digi stamp from Gecko Galz.  The little girl in the heart stamp is done on another digi paper that I created.
Lets peak at the inside...
The White vintage frame is a Gecko Galz image I have used many times.  The Coral pink rose at the top..and through out the paper is one that I painted myself in GIMP.  Check out my GIMP tutorials page to learn how to use this fun FREE program.  Tiny cranberry roses came from an RAK I won at the Flying Unicorn.  The flatback pearls and pearl sprays are from Pro 31 Designs.  I created the "To," "My" and "Love" pieces in GIMP as well.  Just like always..my edges have been inked with Vintage photo distress inks.  I have used Perfect copper perfect pearls as well.
I designed my pieces in GIMP and Inkscape.  Then I used both Make the Cut and Sign Cut Software and my new 
Black Cat Cougar to cut them all out.
Here is the other side.
The tag in this pocket is almost identical to the one in the previous pocket.  One side is for a photo, the other for journaling :0)  Here you will see some May arts trim (green leaves) and an antique button..that I am using as a flower.

Here are what all the pockets look like without tags in them...well the upper half anyways.  I designed the envelope to look as though it has a pink damask liner.  This digital paper was a freebie I found on the internet.  I used my CINCH to bind my mini.
On to the next set of pages.  The gold crowns that I placed on the little boy and girls head are from the Graphics Fairy.  The Large black and crown on the tag to the left is also a Graphics Fairy image.
The tiny pink rosebuds I won in an RAK from the Flying Unicorn.  They host fabulous challenges there..you should check them out.
Again I have some pearl trim from Esmeralda's store.  The tags here are ones I created with many layers of different colors..and a few brushes in GIMP. 
The heart is a digital collage I created using a Graphic Fairy Image..and some crowns..and some text..as well as adding the heart background..and digital paper.
This tag says...KING OF LOVE..and there is one identical to it behind my digital heart collage in the previous photo..but it says...QUEEN OF LOVE.  I again Used GIMP and brushes that I found on the internet.  The stamped images on this page is one that I drew and carved myself..and if you follow me..you probably already knew that because I use it a lot.  Here I used it with heirloom gold empossing powder.  The button is just from my stash.
Next set of pages.
You will notice that the tag  on the left is just like the other's I have shown, except that here I don't have the frame on it.  I have some more frames..so we shall see.  The one on the right is one I created using a digital paper that I created (I altered a free pattern I found online).  I misted the Larger flowers with Perfect copper Distress Mists..and then just inked the next layer with vintage photo..and topped off with some Cranberry Roses I won at the Flying Unicorn. Again I used the flatback pearls..and some May arts leaf trim.
Close up :0)
Here is what the book looks like empty..just standing on it's own.
I think this would look gorgeous sitting on a desk...next to your nightstand..or on a coffee table.  Fill it with photos..and have a great piece to start a conversation with.   Here is another view.
I just LOVE it!!  Just gorgeous if I do say so myself...LOL.
I was so excited when I got my first pieces cut out..that I put it together right away..LOL. Notice the back cover...it looks like the inside of an envelope too..and this is how all the pages look if you don't add the extra front flap (which looks identical but creates the pocket).  When I create KITs out of this pattern I believe I will change the back to just the Love pattern paper...so it doesn't look open.  I added some ribbon that I had from my stash to the 1 1/2 inch binding rings.   Now for the tags.
There is the rose that I painted :0)  I have the frame on the one..and the rose on the photo side (this side) is raised with pop dots so that a picture can slide in.  If you get a kit..it will come with the frames..which you can use on these..or create some other tags to put them on.  There is plenty of room at the top..to add some embellishments.  The bottoms..good for flat embellies...you want  it to fit into the pocket.  Here is the journaling side.
So Vintagey!!
Here are some more tags that I designed using some Old tag images..and layers...brushes...etc in GIMP.
I love the worn and distressed look!  The digital heart collage I created is identical on both sides :0)  Here is the other side..you may recognize them now.  
I used some of the stamps I made to do the stamping on these.  I made the mistake of putting the frame on pop dots...so it makes it REALLY tight to put in the pocket..so if you purchase a kit..just put your photo..then glue down your frame...so it is flat...and it will be fabulous!!
So there it is.  I am going to order embellishments..and hope to have the kit listed here on my blog as soon as I have enough embellies.
I hope you enjoyed my Mini Album!  
Goodness I wrote a book...LOL.
Photobucket