Saturday, January 01, 2011

What Christmas Means

Let me start off by saying
Happy New Year!

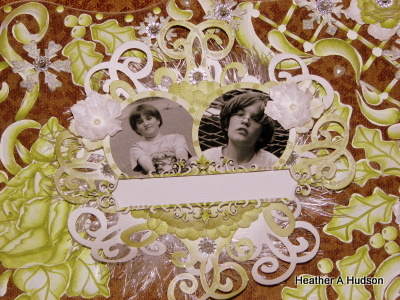
Yesterday when I got home from work I decided to work on another layout.  Unfortunately my printer is out of yellow ink, so I was not able to print a better photo.
Here is my page.
I used papers from my 
I started out again with cutting some strips of my paper, and embossing them with Red or Peridot green embossing powders.  Then I distressed the edges that would show, and inked them with Ranger's Vintage Photo distress ink.  I hand cut out the Angel, and inked her up...and did a little curling of her wings.
I did link this up over at 
Paper Sundaes Challenge Blog
Above you can see how I used the embossing powders and how I used punched strips in black and Ivory (inked with vintage photo).  The tiny curled strips were a scrap from another page.  I did curl up the strips where the met in the corners...just for  a little added texture.
Above you will see how I used  the large poinsettia from the kit (took it apart).  I used some of the petals for a the flourish across the top.  I also used the red berries through out the page (I just took the cluster apart).  The Angel to the right was part of the piece of paper that I used for my Butterfly layout that you can find
I chose to use it in a different layout...to mix it up a bit.
I did add perfect pearls in gold to her Halo, and gown.  To the right you can see the Dusty Attic piece.  
I did take the Dusty Attics piece apart too.  I painted it one of my fav blue vintage colors, inked it with peeled paint and vintage photo distress inks by ranger.  I then added the gems and pearls from the kit...and some perfect pearls in gold.  I also did some free hand holly leaves and swirlys.   If you click on the photo ...a larger one should show up.  Here are two of the smaller pieces of Dusty Attics Chipboard that I did in the same manner as mentioned above.  They are placed on the left of my layout.
I just love all the little gems and pearls!
There were a bunch of pretty tags with the kit, so I decided to incorporate them into the layout...by journaling what Christmas means to my family.  I asked each family member and then wrote their answers down on the tags.
The red frame was created by folding the piece of paper into quarters, and then simple cutting out a design I liked.  I only put adhesive at the very bottom of the red frame piece so that I could use it as a pocket, and place the tags inside of it.
I used my Creative memories markers to write "Christmas 2010."
Below is a full page shot with the tags pulled out. 
I really like this idea, and I hope to do one each year...to see how everyone's answers change as they get older.
Close up of tags and angel.  you can also see the fab red trim that came in the kit too.
Here is a close up of the right side of the layout.
Well....that about much covers it.  The picture was taken at Greenfield Village.  We enjoyed the Holiday Nights program there.
Hope this inspires you to do something creative today!
Thanks for visiting!
Hugs!

Thursday, December 30, 2010

Divine Noel Swirlydoos Butterfly Challenge

Angelica is hosting another butterfly challenge over at
I have not done many layouts this month...well..actually only one.  So this morning I got up and realized that this challenge ends today!  So I made a layout.  The real challenge is this is the 
Christmas photo of the boys I took this year.
The boys all received these awesome hats and spelunking flashlights (that is what the boys called them).  So they immediately became Ninjas. Nothing says Christmas like Ninjas.
Okay...so I designed a filigree butterfly with my Silhouette SD.
I had fun with this...and put the letter "H" in each of the wings for "Heather."  I used Gold Tinsel embossing powder by Stamp-n-stuff. I used a sheet of my Divine Noel kit for the background of the butterfly.  I stamped it with Ranger's Distress inks in Vintage Photo..and inked the edges.

I did my layout a little different by using a sheet of cheaper paper to place my papers on.  That way they look layered..but I didn't have to use much paper.
The First strip to the right...stamped with Vintage photo and distressed with my craft knife..and inked.
Here I added the second strip..it was embossed with the same gold color as above.  I got the embossing powder at Michaels craft store.
Here you can see where I used One of Martha Stewart's Punches to add 2 more layers..one in cream..and one in green (to the left).  I cut out the frame of one of the pieces of paper from my kit.
Here is the paper I will use as my background...I will cut it down to size..so it will fit right on top of the pink paper.


I added the black punched piece to the bottom of the paper...and goofed on another black punched piece ....but decided to use it to cover up the lower right corner.
Wow!  Wasn't that fast...lol.  This is the finished piece.
Here are some close ups below.
Upper left corner...added another one of those goofed up punched pieces in black...and added some of the tiny bird and holly embellies too.
Here is the upper Right.  I took the twig of berries apart, and just glued little clumps here and there.  The leaf was a larger leaf that I cut down to the size I wanted.  The Red petal came from the large poinsettia flower in the kit...I just took the whole thing apart.
The trim and stick pin are also from the kit.
Here you can see one of the punched strips in green, some of the green pearls from my kit ..and how I embossed the dusty attic piece with gold tinsel.  I then added a green jewel and pearls to give it more dimension.
Here is the top center of the page.  I used another punched piece around the center photo...and embossed the black mat as previously done with other pieces.  The photo acts like a pocket to hold the tag...and the butterfly acts like a pocket to hold the photo.  So I could change it, if I wanted.
Here is a black flower, more leaves and petals that I took apart to form my lower right hand cluster.  I used another 
piece that I embossed in gold tinsel.
Here is a close up of the butterfly.  I used one of the flower pieces as part of the decoration for the butterfly.  I also used two of the poinsettia petals to add dimension to the wings.  It is hard to see, but I used part of a Dusty Attic piece for the added dimension for the body.  It too was embossed with Gold tinsel.
 One last butterfly close up.
Here you can see the hidden tag.
Thanks for visiting!
Hope this inspires you to create something beautiful today!
Hugs!

Wednesday, December 29, 2010

Winter White Layout Finally Finished!


Well I finally had some time to work on my Winter White Acrylic Layout.  Here it is so far....
I did do some letters for the Dusty Attics piece..but my DH moved all my scrapbook stuff to a new area for me..and I have yet to figure out where they are.
I will have to get some more photos...as it was dark when I took these and the flash washes everything out.
The idea behind Lisa's Challenge was that we needed to have a Winter White Layout plus one color and we had to use summer photos.  Here is my Gabe on the green machine and Caleb sitting in the Hammock.
I made all the flowers out of plain white cardstock that I painted with avocado...or inked with peeled paint.  
If you are interested in seeing the sketch of this before I painted it on the acrylic....just follow the link below for the first steps.
Thanks for visiting!