Saturday, April 16, 2011

Card for a friend (Funky Fold)

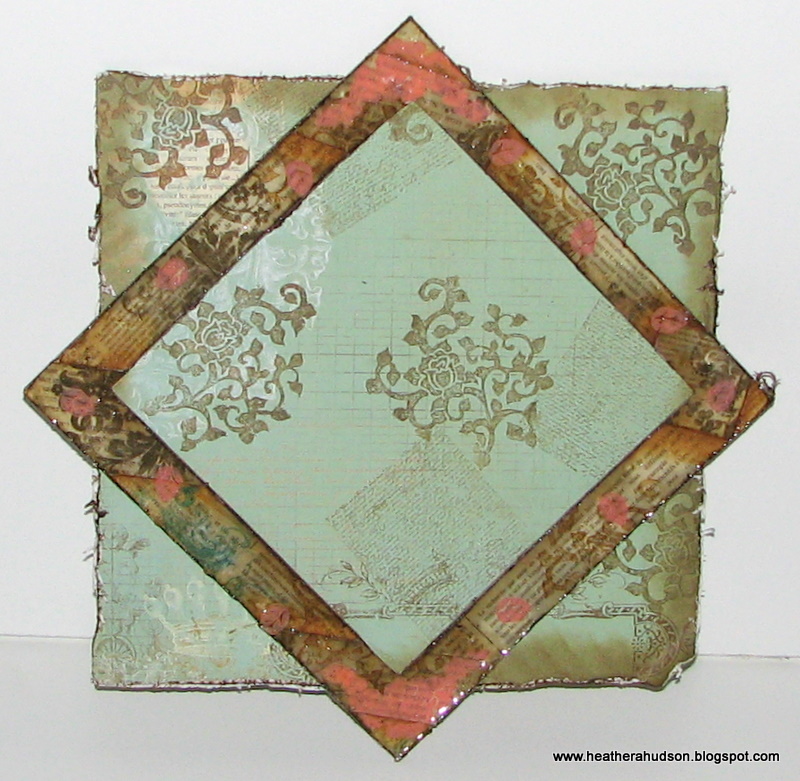
Today I am finally getting around to posting a card that I created out of my Swirlydoos kit, and for a challenge over at  365 Cards.  This week over there they have some Fabulous "Get you Creating New Things Challenges"  So this is a new style card for me.  I just love how it turned out.  It also has my Favorite Vintage feel, so I linked it up to Trulyscrumptious Challenges.
It is ViNtaGe YuMmy!  I used one of the stamps I carved in the upper left using stazon ink in jet black.  I also stamped the clock face with the same ink (it is stamped on the blue pp and brown pp). I used a left over piece of flowers (martha stewart punch), and of course my favorite Dusty Attic Chippy.  I did use my distrez tool to distress ALL the paper edges, and then inked them with Ranger's Vintage Photo.  I think I will have to send directions with the card on "How to open"..lol.
You can see here that the blue pp is attached to the upper right side of the card.  I altered the Dusty Attic piece, by cutting it into a couple pieces.  Adhered the top piece to the blue pp, and the bottom is adhered to the lower left piece of brown pp.  You simply slide the blue piece of pp behind the DA piece on the bottom, and then also use the clock hand to hold the card closed.  Super Smooth...I just love it!
I did use Art Glitter Glue to hold down just the bottom edge of the DA piece, so the other paper could slide behind it.  I also punched two little holes with my crop o dile and added grommets on either side of this piece.  I strung  a piece of beading wire with some beads around it.  You can see the other two pieces of Dusty Attic on the center piece (they were all embossed with copper color).
Here is the center of the card.  All the papers are from my April 
Swirlydoos Kit.  The super Fabulous Crochet Butterfly is from one of my Best Paper Peeps...Carol, she plays with me over at Bella Creations.  She made me a big pile of these awesome butterflies!  Too sweet!
Isn't that butterfly just fabulous!  I used some liquid pearls to embellish the frame around the wording.  I used an Eksucess punch with some Swirly paper...which this month is by Bo Bunny...the Gabrielle collection.  I inked it with chipped china by Ranger.
Thanks for visiting!
Hugs!

Wednesday, April 13, 2011

Dusty Attic Contest at Swirlydoos

This month at Swirlydoos they are having a Dusty Attics Chippy contest.  If you click on the Swirlydoos link, you can read all about it.
All you have to do is enter a layout with a piece of chipboard that you have "dressed up."  I unfortunately don't have much Dusty Attic...so I am all over this Contest...lol.  I chose a "Vintage look" because that is my favorite!  So I will be linking this up to the Truly Scrumptious #55 Challenge.
Here is my layout using my Swirlydoos April Kit.
I started out with a 12 by 12 inch piece of chipboard and cut a decorative edge for it. 
 I used a ruler and cut out a large square from the center to create a frame.  I did the same thing to the piece left in order to create another frame.  You can see this process below.
Here is how I would like to use it.

I took 1 inch strips of my pp and adhered it in different directions to the smaller diamond frame.  I also used the stamp that came in the SD's kit to stamp on the blue pp along with my favorite background stamp that I carved myself (used Ranger's Vintage photo).  I also used my Distrezed tool to distress all edges!
I then inked the edges, stamped some of my hand carved stamped images on it, and then shaded with Spice brown (Delta acrylics) where the pieces overlapped to form even more depth.  I then covered the whole piece with Perfect Medium and Utee.
Next I started on the larger shaped frame.  My background pp that has the stamp from the kit...before it is distressed.
Here is the larger frame covered with another piece of PP from my kit.  I used one of my flower stamps (that I made) with Stazon in Jet black ink and drew a small rose and some leaves in the lower right corner, which I will paint to coordinate with the Gabrielle Papers by BoBunny.
I used Americana Acrylic paint to basecoat the leaves and rose and also my Dusty Attic piece (further down in post).  I then used Delta Forest green to shade the leaves, and Delta Flesh to shade the rose (and small round areas on the Dusty Attic).  I applied Perfect medium to the whole frame and took a gazillion hours to cover it in Utee!  Took FOREVER...but well worth it!  I then used a perfect medium pen and did some free hand drawing around the edges and then applied perfect pearls in Perfect Copper.  Gives the whole piece a really KEWL antique look
Here is a photo of the Dusty Attic piece.  I did all the shading with Spice brown by Delta, and then covered with UTEE (the photo is before I added the utee).
Thank goodness I LOVE to paint!  It turned out Fabulous!  Goes Great with the Gabrielle line of PP!  Once I covered it with Utee, I also used Ranger Liquid pearls in Bisque to add even more dimension.  Here is a close up of the bottom Right.  Pretty good photo of the DA and Frame details.
I used a Martha Stewart punch (the flowers to the right of my photo), and used the same colors of paint to paint them.  They too were covered in UTEE.  The Butterfly and Dragonfly came from some Graphics Fairy images I used to create die cuts with my Silhouette SD (they are covered in Utee as well).
I left these images large, so that you can click on them and make them bigger.  I bought the fabulous trim from my local JoAnns.
One more shot of the full page!
I made my boys sit for 20 pictures...lol...and this is the best one I was able to get.  Craziness!
Thanks for visiting!
Hopes this inspires you do create!
Hugs!

Sunday, April 10, 2011

Fun with Spray Paint

"Boys having fun with Spray Paint"
Over at Bellas this month they are having the "April Tres Chic" challenge.
The rules are: Black, silver, turquoise and white for the color scheme.
(I did follow this rule)
You need a Token, Butterfly, Garter, Flower and some Cardboard.
(I used a dragon fly, gears and a shoe lace...because my boys protest)
Here is my page!
 Now that page says "Grunge and Boy" at the same time!
So if you feel like seeing this in some stages...then just keep reading.
Upcycle of a box!  Yay!  Two pieces.
Used the Fabulous Distrez tool to make a mess in my basement..and make the edges super kewl!  Used My Crop O Dile big bite to punch holes, and just tore off some of the top layer of cardboard.
Spritzed with Ranger Perfect pearls mist in Turquoise and Heirloom Gold...which looks not so gold..lol
Used an 1 inch angle brush to shade around the edges in spice brown by Delta Ceramcoat.  
Shaded again with Black Green.  Not sure why I did all this...because it all pretty much gets covered up..lol.  I never know quite what I will do...so good thing it is the "Process of creating" that I find relaxing vs my finished piece.
Here are some close ups:
I used Cardboard to create my "Boys" tiles.  Inked with Walnut by ranger and written with a bold tip Creative Memories marker..and covered in UTEE.  Ranger Gear die with black card stock..spritzed with Turquoise perfect pearls mist and covered in UTEE.  I did this for all the Fabulous Dusty Attic Chippies.  I just used a long piece and cut it up..and used it all over.  
I created flowers using the Gears.  I used stickles in silver on the shoelace as well as Tulip brand fabric paint (I have at least 50 or 60 of these..and they are not much different).  The Star on the photo..and the other stars are all cut out of dryer sheets.  Spritzed with PPM in turquoise and Utee.  
You can see the Fiskars punch I used here, and some of the dragon flies and DA...as well as a large Fabric sheet star and gear flower.
More lettering done on cardboard.  You can see the lacing and grommets that I used her to hold the two pieces of cardboard together.  The silver gears are black card stock with silver embossing powder.  
I printed out all the photos on white card stock, matted with turquoise and then black cardstock (each layer distressed).
Here are the images I used ...because...no..I did not let my boys spray paint the garage or the brick..lol.
I used my son's favorite "Epic Smiley Face" which he draws on EVERYTHING!  Epic is an "Epic" word don't you know..LOL.
This is all I could get out of my older son.  He didn't want to play along.  I will take what I can get!  I used his favorite game...being World of Warcraft for those of you who don't know what "WOW' stands for..lol.
I used GIMP to create a brush to look as if the paint came from a spray can.
Here is the fabulous image from the Graphics fairy that I adapted for my layout.
I just took out the sweet little guy, and fixed the wings so yo couldn't tell.
Well...that should about cover it.
Thanks for taking the time to visit my LONG post...lol.
Hugs!
Have a great day!