Tuesday, August 27, 2013

Blue Mason Jar Tutorial & Really Reasonable Ribbon Sale

Hello Peeps!
Happy Tuesday!!
First off I wanted to let you know that Bonnie at 
Really Reasonable Ribbon 
is having a 
4 Day Pre Labor Day Sale!  
The sale starts today and ends at Midnight Eastern Time on August 30th.
Spend up to $39.99 and save 10% using code
LABORDAY10
Spend $40 or more and save 15% using code
LABORDAY15
The sale is good on sale items!!
Today I would like to share with you a small vintage blue looking mason jar that I altered for my mom.  
I started out with a light blue Mason Jar, and I took off the top and painted it ivory.  I purchased this new from Meijer the other day.
I cut out my collage pieces, and inked them with Ranger's Vintage Photo Distress ink.  I used a fine tip applicator and added the Designer dries clear glue along both side edges of my square piece.
Next I added the Juliet Lace from Really Reasonable Ribbon to my sides, I added the Foam Tabs to the back of my square piece.
I added the foam tabs to my heart, being careful to leave room so I could slide some ribbon behind the piece once I adhered it to my jar.
I centered my heart onto my pink square piece.  I added the foam tabs to my Pencils & Pens label.    I left the center open, because that part of the label will lay flat on the heart piece.
Next I wrapped my Edna Crochet Lace around my jar, trimmed it, then glued it in place.
Next I added my square piece to the jar.
Next I took the Satin Pearl Pink ribbon, and threaded it behind the heart image, and around my jar.  I tied it in a bow in the back.
 I also took some of my favorite Light Pink Organza, wrapped it around the mouth of the jar, and tied a bow in the front.  Here is a shot from the side.
I added some designer dries clear glue with the fine tip applicator around the edges of heart and label.
Then I applied Rose Gold Ultrafine opaque glitter.
I added a sweet little button from the Vintage Button Bonanza Collection and tied a little bow with the Aqua Baker's Twine.  I placed my painted lid on top, and my sweet little jar is all finished.  
I filled it with my mom's favorite candies, so she can keep it as it...till she wants to use it for Pencils & Pens.   I also bought some pencils and pens...we are always looking for a Pencil or a Pen when we are there...lol.
Here are a couple other photos.
The Back.
The side.
I hope you enjoyed my tutorial today!
Thank you for visiting us at
Hugs!!
Heather

Sunday, August 25, 2013

Gecko Galz Circus

Sometimes
 I feel 
like an 
Elephant!
and I 
will
work
for
Peanuts!
Hello Friends!!  Today I was thinking about how long it had been since I had participated in any challenges other than my own Design Team challenges.  I thought I would head on over to 
Simon Says Stamp and Show...and OMG...it has been so long..that they had moved their Challenges all over to one site.  
Either way...I found them, and when I saw the Carnival theme for the challenge...I knew the Gecko Galz "Life is a Circus" digital papers would be perfect!  I figured since I was playing along with one challenge I thought I would look for another.  I thought about a sketch.  I can tell you that I really have a lot of fun when I pick out a couple challenges, and then create something specifically for them.  Unlike the create something ...then go and look for challenges...lol.
I looked up sketch challenges...and found Tuesday Morning Sketches.  The Best thing was...I have about 3 hours left before the challenges close...so....pressure...lol.  Of course I got GIMPING...and here is what I came up with.
I stated out with a 5 by 7 inch ivory cardstock base.  Inked all my edges with ...get this...not vintage photo like normal...lol..but walnut stain!  Figured I better use something a little darker with the papers and theme!

I took the Tuesday Sketch below and pasted it in GIMP.
Then I started creating layers with the different digital papers from Gecko Galz.
The fabby Elephant image is from the Graphic Fairy!
I used Scor Tape and Foam tabs from Really Reasonable Ribbon to adhere all my layers, and create depth.
I also used a button from the Vintage Bonanza Collection tied with Brown Sugar Baker's Twine.   I just love the three little peanuts that I used...too cute!
I then used my Art Glitter Designer dries clear Glue and Ultra fine Metal Tip to add some lines of glue to my card.  Then I applied the #317 Dew Drop#349 Garnet#91 Ornage Crush glitters to my card.

I will be playing in the two challenges below.
Hugs
Heather
Thank you for visiting!!

Collage Sheet Winner

Hello Peeps!!
Today I just wanted to Thank everyone who left a comment on my blog hop project.  I did my Random Draw on Comments...and here is my Winner!
She is the winner of my Bee Collage Sheet.
Thank you all for visiting!!
Hugs!!
Heather

Monday, August 19, 2013

Art Glitter Butterfly Album

Hello Friends!!
Happy Monday!!
It is my turn to post at Art Glitter and this month we are featuring Want to Scrap Goodies!!

I used a Gorgeous Combination of Art Glitters and the
 Want to Scrap Goodies!! 
Please hop on over to the Art Glitter blog to see my Tutorial and leave a little love.
I know the post is up...:0)  LOL

Hugs!!
Heather

Sunday, August 18, 2013

Vintage Dragon Fly Card

Hello Friends!!
Today I would like to share with you a set of cards that I made using some fabulous ribbons and other goodies from 
Really Reasonable Ribbon!
and 
Gecko Galz!
Card One

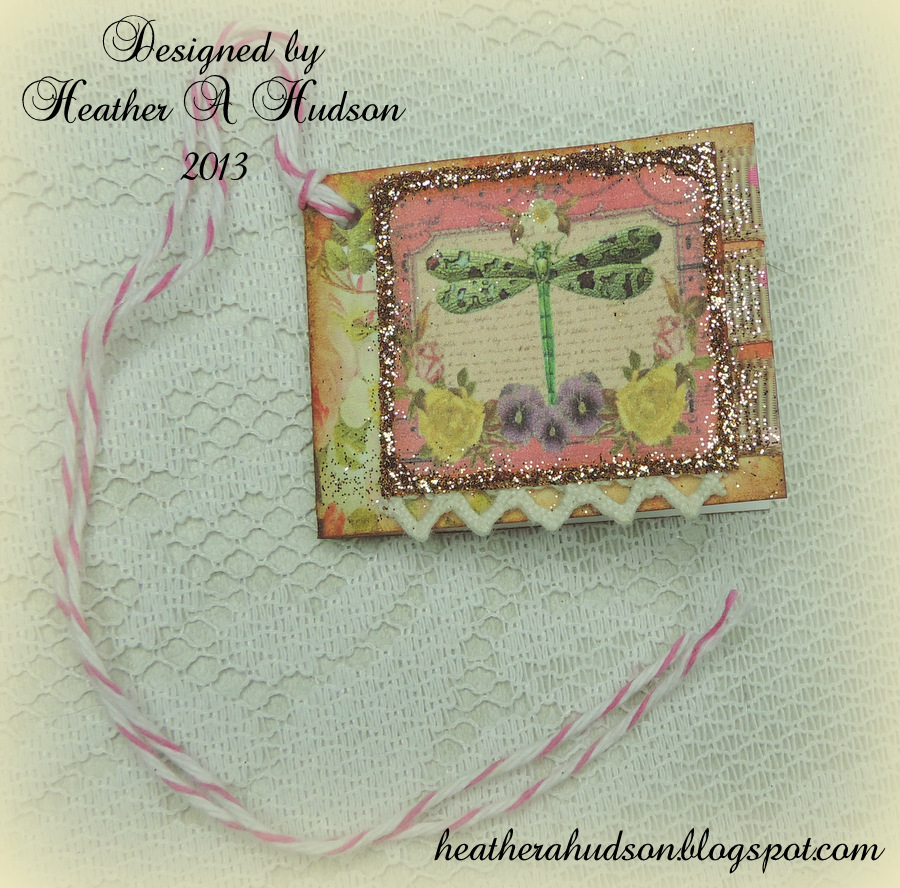
I created a digital collage using this months Darling Dragonflies and Book Cover's Collections from Gecko Galz.  I also added some pansies, roses and tiny white flowers from the Graphic Fairy.
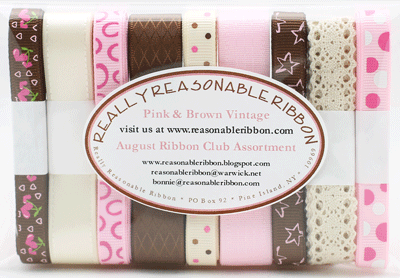
I used the crochet lace, cream with polkadots and Brown Diamond ribbon's from this month's gorgeous Ribbon Assortment.  I just love this assortment!
Monthly Ribbon Club, Domestic
I started out with a Cream colored 5 by 7 card stock base.  I then used the digital papers and images from Gecko Galz to create my card.  All my edges were inked with Ranger's Vintage Photo distress inks.
Here is a close up of the center.  I used Scor Tape to adhere all my paper layers and most of my ribbons.  
I layered the Brown Diamond Ribbon, and cream with polka dots ribbons on top of the Pink Crochet Lace.  Then topped them off with a button from the new Vintage Button Bonanza set from RRR.
I tied a lovely bow with the Cotton Candy Baker's Twine.  I tucked some Natural Crochet lace under my bingo layer both at the top and bottom of the card.
At the top of my card I also used more Crochet lace from this month's assortment and more Cotton Candy Baker's Twine.
Card 2
I used a lace punch from Martha Stewart and punched some scraps of paper which I tucked in between layers on both cards.  Glitter was added to finish off the vintage look.
I used the Crochet lace and Pink Satin ribbon from this month's assortment across my image.  Then buttons from the Vintage Button Bonanza were tied with the Cotton Candy Baker's Twine and placed on the top. I adhered the button with Designer dries clear glue.  I LOVE LOVE this new button set!  I also used the brown ribbon with Pink stars to create a little bow on my card. 
I also used the same image, to create a tiny gift tag.
Cotton Candy Baker's twine, crochet lace and the cream with polkadots (this month's assortment) were used on my tiny tag. 
One more look at the finished cards.
The other card.
I hope that you have a great day!!
Thank you for visiting!!
Heather

Thursday, August 15, 2013

Really Reasonable Ribbon Pink and Brown Challenge

Hello Friends!!
Happy Thursday!!
It is the 15th which means it is time for a new challenge at
We are asking you to use the colors 
Pink & Brown and of course some Ribbon!
Here is what I came up with for the challenge.
A Birthday Tag!
I chose to use some of the ribbons from Really Reasonable Ribbon's
Monthly Ribbon Club, Domestic
Isn't the assortment just beautiful!!
Couple close ups of my tag.
I used the Sweetheart Cherries and pink crochet lace across the bottom of my tag.  I used the Scor Tape to adhere these ribbons to the tag base.
I used the Sweetheart Cherries, Random Dots Pearl Pink & White Dots, and Multi Dots Pink/Brown  from this month's assortment to create a fun tag top!  You can see how I used Ranger's Vintage Photo Distress inks to ink them. 
  I also used another smaller pink crochet lace at the top of my tag.
 Brown Sugar Baker's twine was used to tie little knots in my Vintage Bonanza Buttons!  I think they are too sweet!!  Just like my little cupcake, which I designed and painted in GIMP.  I used my Art Glitter Designer dries clear Glue and the Ultra fine Metal Tip
on my cupcake top.  I added some #267 Cheeky Pink glitter to my frosting, and Auburn no hole glass beads for my sprinkles!
Close up of the sprinkles.
One more look at the whole tag!

Here is the Shabby Cupcakes Collage Sheet I designed, 
which you can purchase in my Etsy here.
MyVintage tags collage sheet 
you can purchase in my Etsy here.
Vintage Music Large Tag Backgrounds Digital Collage sheet
I hope you find some time to come and play along with our

Thank you for visiting!
Hugs
Heather

Tuesday, August 13, 2013

Really Reasonable Ribbon Blog Hop

RRRBlogHop[1].jpg
Hello Friends!!
I am so excited to be participating in the
Hopefully you are visiting me from Cherry's Blog.
If you are just joining the blog hop, then you will want to start at the 
Really Reasonable Ribbon Blog.
That way you can see what you can win, and not miss out on any of the Design Team's fabulous creations using this month's
Really Reasonable Ribbon Assortment!!
Here is a photo of the Ribbon Assortment below!! 
Monthly Ribbon Club, Domestic
This month is one of my FAVORITE assortments!! The colors are lovely!  Pinks, browns...and cream!!  Gorgeous!!
When I saw this month's assortment, I knew it would go fabulous with a set of digital tags that I designed.
Here is the set of finished "Bee" tags.
Pin It!
  I used GIMP to create the "Vintage Bee Tags."  I found the bee and bee hive images at the Graphics Fairy.  You can find the collage sheet in my Etsy.
****If you would like a chance to win my collage sheet, then just leave a comment below.  I will do a random draw from the comments, and announce the winner on Friday August 16th on my blog.****
Here are some close ups of the tags with this month's fabulous Ribbon Assortment as well as some other fabby RRR goodies!
I used the brown satin diamond, natural crochet lace, and cream satin from this month's Ribbon Assortment.  I also used Scor tape to adhere my trims and layers of paper.  Below you can see the Brown Sugar Baker's Twine.  


A close up of the top.  More of the crochet lace and brown diamond ribbon.  I also used a few buttons from the new Vintage Button Bonanza.  
Tag 2
This time I used the same ribbons, trims and buttons... just set the tag up a little differently.  I also used some of the 3D foam tabs to elevate my center image.
I used Ranger's Vintage Photo Distress Ink to distress all my pieces.  
I also used a little glitter to add some shimmer to my tags.
I just love the vintage look of all of the tags.
The last tag.
On this tag I used the Cream Satin, crochet lace, pink satin, polka dot ribbon and the brown with stars ribbon from this month's Ribbon Assortment.
Again I used the Scor Tape to adhere all my trims and layers of paper.  I used the 3D Foam tabs to elevate my image.  I did ink the polka dot cream ribbon with Ranger's Vintage photo distress ink.  I used another button from the Vintage Button Bonanza set tied with Brown Sugar Baker's Twine.
One last look at all three finished tags.

I just love this month's ribbon assortment, and enjoyed working with it!!  
 I hope that you have been inspired to create some fabulous projects and do a little shopping and maybe get yourself some fabulous finds from Really Reasonable Ribbon.


**Next stop on the Hop**
Time to hop on over to Tammy's blog,
 see what she has created, and leave her a little love.


Thank you for visiting!
Hugs!!
Heather