Monday, November 29, 2010

Final Recipe: 365 Cards Vintage Blog Hop

So today I finished my "recipe card"  for the 
Here is what I came up with...and tomorrow...I will add some more photos...of how I got to the finished product.  My kids are wanting me to watch a show on Netflix with them...lol. 
I used Graphic 45 papers...since Gloria (Graphic 45 DT member and 365 Cards DT) is the one sponsoring the Vintage Blog Hop!
Here are some close ups below


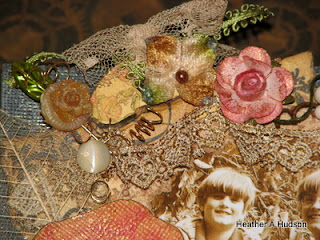
Gloria wanted a stick pin or hat pin for here part of the recipe.  You can see that I started with a Mya (sp?) Roads Leaf stick pin...and I added a vintage button..with my FAV beading wire..and then an acrylic rose...from a piece of  Bling from the Swirlydoos store.
Sophie listed lace...here you can see it wrapping around my photo.  
Sophia's ingredient was a button...which you will see all kinds of vintage buttons on this card!
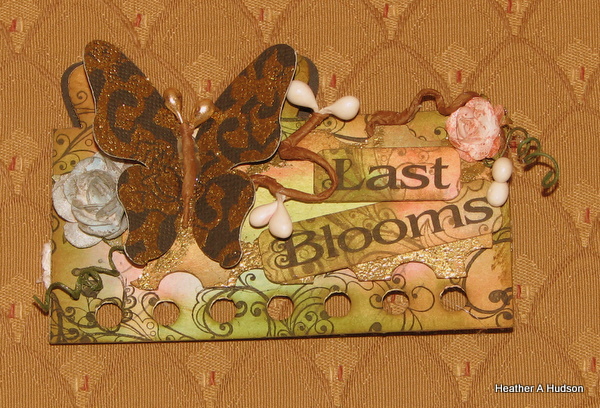
The Rose and the Ticket are both die cuts that I drew and painted in an online program called GIMP (it's free).  I used Ranger's distress inks in Vintage photo...distress stickels in shabby shutters...and Dried Marigold.  The Rose is on pop dots...and takes care of
Tesa and Hannah's ingredients...die cut and dimension.
Today...when I was visiting 365 Cards day 274
I saw that Sohpia had made what she called an Easel card.  I thought that was super cool...so I figured I would try it out.  By trial and error...I made one!  It measures 5" X 5".  Wouldn't you know...having a 5" X 5" card was 
Rose's recipe ingredient.
An easel card allows your card to stand up on it's own...and be displayed...you probably already knew that...but hey...now I do too!
This is my own ingredient...lol...I always have to have a little secret tag...or just a tag...in my creations...This one pops out of the top.
You may notice that the G45 pp that is in front of it...well it was distress with a kraft knife blade...inked...and then I used water to distress the edges (which are mostly covered up...lol)  Here is a tute...on water distressing  by Robin over at Swirlydoos.  
I pretty much distressed everything with distress inks...that is just my style.  That was Kim's ingredient.  Did I mention...there are 10 ingredients all together.  All last week...you went from one design team member's blog to the next...getting the ingredients.  Super fun!
Here you can see the tag all the way out.
Here is a close up of some the Graphic 45 paper cut outs.  This is my take on "Stitching"...and "Piercing."  But ...I was not sure if it would count....so
So the tiny bookmark that come out...I actually pierced with a needle...and then weaved my fav beading wire through it.  I also did some faux stitching with a black creative memories pen.  You can see all this above.  This takes care of both Pam's and 
Amy's ingredients!
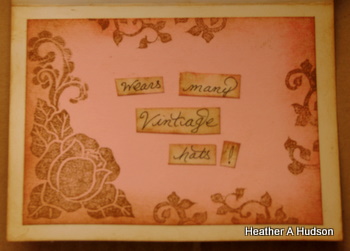
Finally...we get to the inside.  There you will see my stamping...and for once...I didn't use my own stamps...because...well...I like all kinds of stamps!  This was Audrey's ingredient.


That makes all 10!
Some more Graphic 45...on pop dots.  Tomorrow..I will add another post...with some of the "how to."
My kids are yelling for me to hurry up...so I better run..
Since it will be displayed...at my house...because I LOVE it...I had to do something to the back...LOL.
Thanks for visiting!
Make sure you check out 365 Cards to see how the Vintage Blog Hop went...and to see what new Inspiration they have for you!
You know...I am thinking of making a matching box for this...just in case I decide to give it to my mother...or mother-in-law! I will probably keep it...:-)
P.S.  This photo is of my boys playing in a huge tree that fell for NO reason at my parents house a few years ago.
Hugs!

Sunday, November 28, 2010

Great News!

Well... I am glad to see, after going back and reading the rules for the 
That I actually have until tomorrow night to upload photos of my cards!  This is GREAT NEWS!  I had read the rules for the normal 
It is the one...that states photos need to be uploaded by Sundays.  So tomorrow I will get some new batteries...and take some better photos of the Sunday Sketch card.
I will also have time to make a card for the final recipe.

This means you too have more time to go and visit...and see what great things Gloria (she is on the DT at Graphic 45 too) has for 
winner!

Thanks for visiting!
Hugs!

365 Cards Sunday Sketch and Design Team Call

365 Cards is having a Design Team call for their 
Here is the Sketch


Here is my take on the sketch:
I used the Die Cuts I painted in GIMP, and used the Print and Cut feature of my Silhouette SD to cut and print them out.  Below are some close ups.

I stamped the image with Peeled paint by Ranger...and inked the edges with Rangers distress inks in Vintage photo.  I gave all the pieces a glitz of Glimmer mist by Tattered angels...which I bought from my BFF's scrapbook store.  Her link is in the upper right sidebar.

I added the Merry Christmas Sentiment...and then the Candy canes...these are all copyright protected images.


This is the back of the card.  I inked and stamped it in the same manner as the front.

This is the inside bottom of the card.  Unfortunately my camera's batteries ran out...so my DH took these photos with his phone.  So I guess I won't be able to finish the last card for the challenge...but I sure did have fun!   Here is a close up below.
 Okay...so I got some batteries...and took some new photos...and that is what you are looking at today...so bye bye not so good photos...lol.  Except the one below...I forgot to take a picture of that...lol.   Below is the inside top of card.

Okay...so I hope you have seen all my posts...and how productive I have been today.  Please go and visit the 
Remember Gloria who is a DT member at Graphic 45 has some great goodies you can win from joining in on the blog hop!
Thanks for visiting!
Hugs!

Roses: 365 Cards day 271

Okay...so here is my card for the 
On this card I used some old beige lace that I distressed with Ranger's Vintage photo.  I pretty much covered that up with some Green vintage look lace that I love. 
You will notice that the round die cut is one of my paintings that 
I scanned.  I used my Silhouette SD's print and cut feature to create this round die cut...and the "Roses" sentiment.
Again I have used the stamps that I designed and carved on the background papers.
Again I used some vintage buttons and some stick pins by Mya Roads.  The tiny rose was spritzed with Ranger's Perfect Pearls Mists in Heirloom gold.  
Here you will see how I wrapped the tiny rose around my stick pin..to give it a little added vintage flair.  I also used my FAV green pom pom trim.
Sorry...again that I have not had time to do the usual...step by step on the cards.  I just really want to get my cards done...so I have a chance at winning the awesome goodies...that 
So I hope you too have been inspired by all the great DT members at 365 cards...and are as busy as I am creating!
Thanks for visiting!
Hugs!

Love: 365 Cards Vintage Blog hop Day 270 Vintage Card + Dimension

It is really getting dark early lately...bummer.  So this will be a short post...so I can finish all the cards I need to for the 365 Cards Vintage Blog Hop day 270
Here is the card I made for the dimensional sticker..or raised area of a card.  I have had so much fun doing these cards for this challenge.  They have great goodies that you can win...so please click the link above and check it out!  You won't be sorry!
Okay...I painted these roses...and scanned them into my computer.  I used my Silhouette SD's print and cut feature to print and cut this out! My Silhouette SD is my FAV tool!
Below are some close ups.
So..my first pop up or dimension is my flower picture.  I use pop dots on it to raise it off the card.  You will see how I used my FAV trims under it...along with some curly wire.  I also used pop dots under the gold embossed chipboard piece.
This little "Love" dimensional sticker I created using my Silhouette SD's print and cut feature again.  I painted the tiny rose in GIMP (free online program) and then print and cut it out with the Silhouette.  I used Ranger's Glossy Accents on top of it.  So it looks really cool...and like old vintage decoupage.
Please Check out 
for some great inspiration!  Did I mention one of their DT members...Gloria...she designs for Graphic 45...how cool is that?  She is the sponsor...so really great goodies to be won!

Thanks for stopping by!
Hugs!

Believe: Day 269 Vintage Card + Distressing

Wow...time is running out...and going by so quickly!  I am having way to much fun!  Feeling just a tad bit guilty that my house is a disaster...lol.  
So here is my card for the 
Vintage card + Distressing
Okay...I love Vintage style....and I have to distress everything...or it just isn't finished in my eyes...LOL.  Sorry again that I don't have the step by step...
Here are some Close ups below
I used one of my Stamps I designed and hand carved.  Ranger's Peeled paint, Weathered wood and my Fav Vintage photo were the distress inks I used for inking and distressing all the papers...and stamp work.  
I used Ranger's Perfect Pearls mist in Heirloom gold on the creamy color rose...and the smaller rose to the left of the card.  I inked the chipboard with weathered wood...and then gave it a spritz of Heirloom gold too...you can see it below.  You can also see where the right side of my pp has been really distressed...and the background card shows through.
Finished it off with some of my favorite trims.  The believe chipboard came from one of my Swirlydoos kits.
Thank you for visiting....and I hope you get a chance to visit the 
Hugs!

A Fine Woman...wears many VINTAGE hats!

Wow...I worked the past Wednesday through Saturday (I was called off for Thanksgiving) and finally have the chance to start playing with paper!  I mentioned earlier in the week that I was following a long with the 365 Vintage Blog Hop
It has been really fun to check out all of the designers at 365's blogs.  Here is the card I designed for Gloria's part of the Recipe
 So this morning I got to work...and designed a simple "Vintage Hat Diecut"  with my Robo Master program...and I cut it out with my Silhouette SD.  Here is is below
Sorry I don't have the step by step...like normal...but I have a lot more cards to design...and get finished before tonight!  So I will just break this down for you.
I started out by using the stamps I carved to stamp around the edges of the papers (stazon jet black).  I then inked all the edges with Ranger's distress inks in:  worn lipstick, scattered straw and of course my FAV...vintage photo.  I then distressed all the edges with a knife blade. Below are some close ups!
Here you can see the "Hat Pin" I created using some vintage beads off an old Christmas ornament.  I added a little green lace, some white pip berries and a Vintage pink rose.. to top off my tiny Vintage hat.  Believe it or not...I have a bigger hat...and ended up using the small one instead.  Maybe I will use it for one of the other many cards I need to make for this challenge today!  :-) 
This is the upper right of the card.  I used Ranger's new Perfect pearls mist in "perfect copper" on this rose (and the other two that are not on the vintage hat).  Hard to see..but there is some vintage look pinky peach ribbon under one of the layers of paper...and my FAV green pom pom balls trim (it is under the JBowlin polka dot paper).  There is also a vintage button.
The Chip board key, lock and swirl (lower right) were all embossed with gold embossing powder.  I bought the cream flower off Etsy, and the roses I spritzed with perfect pearls came from my BFF's Scrapbook store....you will see her link in the upper right side bar.
Here you can see another vintage button...a find from one of my many antiquing trips with my mother.  There is some more of the pinky peach ..and pom-pom trim...and some copper bead wire..I love to add depth.
Here you can see one of my favorite stamps that I carved....and the gold embossed chipboard swirl.
Below is the inside of the card...which finishes my sentiment
"A Fine Woman....wears many Vintage hats!"
I thought...hat pin...woman...having to wear many hats in todays society....we are busy!  Again all stamp images are ones that I carved myself.  For an example of how I Carve my stamps click on my Angelica Butterfly Stamp.

Thanks for taking the time to stop by and visit my blog...and hope you can make it over to the blog hop and check out

Hugs!


Digi Stamps?

I have been having so much fun lately...visiting blogs and seeing all kinds of new things!  Lately I have been seeing a lot of "Digi Stamps."
I guess it is like a stamp that you print out.  When I get some time, I think I will try creating some of my own "Digi stamps."  How fun would that be?  So if anyone is reading this...and you know about Digi stamps...and you feel like sharing some info with me....please do!
Have a great day!
Hugs!
Heather

Tuesday, November 23, 2010

365 Cards Vintage Week Blog Hop: Vintage plus Stamp

Quick look at the inside.

Here is the card that I made for Day 268, Vintage Plus Stamp.
You can find all the information about the 365 Vintage Blog Hop + Design Team Call
I had never done a "blog hop" before, and have found this to be very fun!  It is also very inspiring.  Many beautiful cards by the Design team there...and from those who have linked their cards!
I still need to make a card for Monday's Card.  Hopefully I will get to that tomorrow night, when I get home from work. 
Below are some photos of the card in progress...and a shot of the inside.
I used my Vintage style stamps that I hand carved.  You can see the one that I refer to in many of my posts as "My favorite background stamp" in the upper right.  I used Stazon Jet black ink for all the stamping.  Of course Ranger's Vintage Photo distress ink for that great aged look on the edges.  
Here is a close up of the sentiment.  I made this die cut by taking a photo of a garden stone I painted for a friend.  I then imported it into GIMP...and cleaned it up...and gave it a clear background.  I then used my Robo Master program to create the actual die cut.  I used the "Print and Cut" feature of the Silhouette SD.  Here is the original garden stone (what the heck..I loved it too) below.
I started one for me..and it is not finished...that is how it goes!
Below are some Close ups of the details.
I used a floral stick pin...and added the polka-dot ribbon and one of my vintage square faceted buttons.  A couple stems of white pip berries and copper colored wire...and  now my card is happy!  I like to think of my work as "Chunky".  
I used Ranger's Perfect medium pen to free- hand some swirlys onto the die cut.  Then I lightly applied the Perfect Pearls in copper.  I forgot to mention that I used Ranger's new "Perfect Pearls Mist" in Perfect copper...on the rose.  I also made sure to use my hot glue gun to place a dollop of glue on the end of the stick pin, and I also strategically glued the white pip berry on top of it.  Wouldn't want to say..."thank you"..and have them poke their finger.  Below is a photo of the inside.
Again I used my fav background stamp...and one of my new stamps that I carved in the upper right.  I of course inked the whole card...including the back (my camera ran out of batteries..so I will photo it later).  So this card is ready to have a heart felt thank you written!
Here is the card upright.
Thanks for looking! 
Don't forget to check out  365 Cards to get some inspiration!
Hugs!
Heather

Sunday, November 21, 2010

Sunday...What to do first? Butterfly Mini

Happy Sunday!
I just couldn't decide what to work on first today.  
So here is a sneak peak at what I am starting on today.
I am starting out with the resist papers from my Swirlydoos kit.
I used my Silhouette SD "RoboMaster" program to design a tiny Butterfly book.  I kind of goofed on my first resist paper..so I am hoping to fix it with this book (don't want to waste my papers).
I used my "Cinch" tool to punch holes into my tiny butterfly book, you can see this below.
This is the tiny book closed...
below is how it will look opened.
I used Ranger Distress inks to color the resist paper...and other paper from my Swirlydoos kit,  Worn lipstick, peeled paint, tumbled glass and of course vintage photo.  This is how they look now (I was able to fix my previous ink job..lol)
 Because this was paper, I glued two pieces together...so that it would be more stable.  The other side of the pages are shown below.
Of course I had to stamp all the edges...because that is just part of my style.  This time I used a stamp I bought...because I wanted and airy feel to it (Once I read my Teresa Collins stamp maker directions, I will make my own airy stamp).  
This time I used Al A Mode dye ink in black for the stamping as seen below.
I did stamp both sides...so here are the other sides below.
I also cut out some butterfly shapes (I bought a set from the Silhouette store).  I used black card stock, and used Ranger's Big and Bossy embossing ink...and embossed with Gold Tinsel by 
Stamp -n-stuff.  See below.
I am thinking now of binding the book...thinking....then doing the decorating....I think I recall last time I did the binding...I thought I should of bound it first, then decorate. 
So most of the day has passed and I have been playing with these pages.  Here are the pieces I am thinking of using on the cover below.
 I did decide to go ahead and bind this book, but...I only had 1" coils.  Unfortunately..I like to scrap "Chunky"..I only have 2 pages done...and it is going to be too thick.  Tomorrow...I will head out to get Larger rings.
Here is the cover ...and how it looks right now.  Very "Vintage Chic" which I love.
Here it is from the side...so you can see that I need bigger rings.  Hopefully I can find some darker ones...but I will be tying it with all kind of ribbon anyways...LOL.
Check back tomorrow night...and maybe I will have some updated photos!


Okay...so I ended up taking the binding off....because it wasn't going to be big enough.  I decided to work on the pages off the rings.  Below is the back of the Cover
A couple close ups below
I ended up using an exacto blade and just cutting out some leaf shapes out of the resist paper.  They are tucked in the lower left...and one in the upper right.
This was a new type of snapdragon that I bought from Bordine's Nursery this year.  I alway have tall pink, white and red snapdragons...with blue salvia.  Beautiful combination.  I took these pictures of my last blooms for a challenge of Manda's over at Swirlydoos.  It was supposed to be garden shots...but I just stuck to what was actually not dead looking!
Here are two pages together.
It is a tiny half sheet.  I used my pp from my Swirldoos kit..and didn't have much left...therefore half sheets.

Here is the flip side below
I have one more page finished...it is below
Just the one page ...below
A Few Close ups
Lower right
I used the Pink Paislee Artisan elements..just cut it in half..and placed around the flower...as a frame...and used some of my fringe from the kit too.  I love how this is turning out.
I will probably create a new post ...when this is finished....I really need to do some house cleaning now..LOL...someone help me!
Thanks for visiting!
Hugs!