
Hello Peeps!!
I am back from Alaska!! Alaska??? That is right, my DH's parents paid for us (the two of them and my family) to go and visit my DH's brother in Alaska. How could we say no?? So I had a fabulous time, enjoyed beautiful scenery for 10 days! I will write a post up all about it once I get all my photos together. By the way this was not a "Cruise" my BIL and SIL are VERY outdoorsy...so we hiked everywhere! Meaning...sometimes I was closing my eyes and praying I was not eaten by a bear....lol.
Gecko Galz for a Cause Post
Leanne the owner of Gecko Galz asked each of the Design Team members to create a project for a cause this month. What does that mean?? We were to use any images we wanted from Gecko Galz, and at the end of the month, everyone will get to vote for their favorite. The winning Design Team Member will get a donation to the Cause of their choice. So my cause is
Some of you may know...those that don't will...I work as a Registered Nurse, specifically Rehab. I have worked many years with individuals that have suffered from Spinal Cord Injuries (SCI) and other diseases that leave them needing some assistance. The CIL helps individuals with finding some independence. Wonderful people that work there, a few that I know personally.
So here are my creations.
I used the "Blue Willow" (Secret Garden set) and "Fleur De Lis" (Ooh la la set) Digital papers for my card layers. I used the "Wild about Flowers" and "Ephemera Days" collage sheets as my focal images.
I used some of my favorites Ribbons and Trims from Really Reasonable Ribbon, and glitters from Art Glitter. I will list them under each card.
In a nutshell, I used GIMP to size my images on three pages, printed them out, cut them out, used my Perfect Layers ruler to create my paper layers, adhered them with scor tape, added some glue, glitter and ribbons.
In a nutshell, I used GIMP to size my images on three pages, printed them out, cut them out, used my Perfect Layers ruler to create my paper layers, adhered them with scor tape, added some glue, glitter and ribbons.
Card One

Gecko Galz: "Blue Willow" (Secret Garden set) and "Fleur De Lis" (Ooh la la set), "Wild about Flowers" and "Ephemera Days".
RRR: Juliet Lace, Moss leaves and Latte button, Candi fix it foam pads and Scor tape.
Art Glitter: Art Glitter Designer dries clear Glue, Ultra fine Metal Tip, #267 Cheeky Pink, #295 Ensalada, #352 Chamois, #226 Lily of the Valley, #183 Blue Angel and #123 Dusty Blue.
Close ups

Close up

Card Two

Gecko Galz: "Blue Willow" (Secret Garden set) and "Fleur De Lis" (Ooh la la set), "Wild about Flowers" and "Ephemera Days".
RRR: Juliet Lace, Moss leaves and Latte buttons and Scor tape.
Art Glitter: Art Glitter Designer dries clear Glue, Ultra fine Metal Tip, #267 Cheeky Pink, #295 Ensalada, #352 Chamois, #226 Lily of the Valley, #149 Azure, #350 Butterscotch, and #349 Garnet.
Close ups

Close up

Card Three

Gecko Galz: "Blue Willow" (Secret Garden set) and "Fleur De Lis" (Ooh la la set), "Wild about Flowers" and "Ephemera Days".
RRR: Juliet Lace, Moss leaves and Latte buttons, Pink Diagonal ribbon, Edna crochet lace and Scor tape.
Art Glitter: Art Glitter Designer dries clear Glue, Ultra fine Metal Tip, #7 Red Rose, #295 Ensalada, #352 Chamois, and #183 Blue Angel.
Close ups
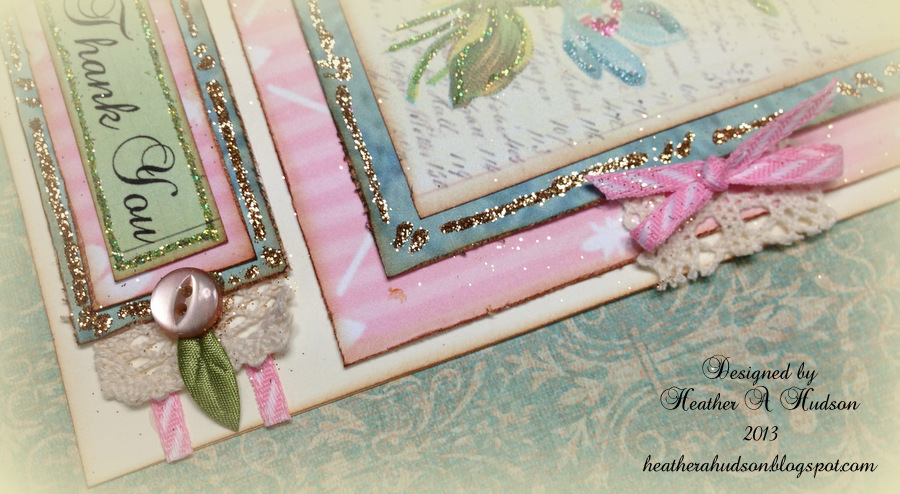
Close up

Maybe you are wondering, how did she do all her paper layers? I am happy to say that I am a new Brand Ambassador for
I used the Perfect Layers Rulers to create all my layers (you can create 1/8" up to 1" mats around your images with this ruler) in my cards. The rulers work great and my images were not a standard size. You can get yours here, and receive 5% off using my code Heather5%.
I will do a video soon, showing you how to use the rulers...easy peasy!!
Now don't forget to go to Gecko Galz and Vote for me by August 30th.
Thank you for visiting!!
Hugs
Heather


