Thursday, January 31, 2013

"Christmas in the Bank" Tag Set 2

Hello Friends!!
Happy Thursday!!
Today I have another set of Christmas Tags that I have created for my buddy Sandi's "Christmas in the Bank Challenge"
Pin It!
I found a couple images from Karen the Graphic's Fairy, and of course used GIMP to create this beautiful Christmas Blessings Christmas Tag Collage sheet.  The base of the tag is a music paper, and the image is of two beautiful blue birds!
Remember the whole idea of Sandi's Challenge is to create 12 simple tags for Christmas, for the month of January.

On the tag above, I inked my edges with Ranger's Vintage Photo, and then distressed the edges of the image, and inked it as well.  I used the red swirls ribbon, peppermint baker's twine and Juliet lace from Really Reasonable Ribbon to embellish my tags.  I also used some of my favorite champagne pearls.  Below I used the same ribbon and Trims, but I just did them a little bit differently.
Here are a couple close ups below.
Yummy!!  I should of eaten before I did this post...looks like some yummy candy :0)
I did use the candi fix it foam pads from RRR to elevate my image and text box off the base of the tag.
I am so proud of myself, this past Tuesday has been the first day of getting back to "normal life" since the 1st week of January.  I have been a creating maniac :0).  Of course you can find the
I will be sharing with 
Make it Monday:  Anything Goes
Brag Monday: The Graphic Fairy
Thank you for visiting!
I hope you join Sandi's "Christmas in the Bank" challenge!!
Hugs!!
Heather

Wednesday, January 30, 2013

Tim's "12 tags of 2013" Heather Style

Hello Friends!!
Happy Wednesday!!
I am sooooo excited!  Today I took the time to go over and read Tim's Blog and looked up his
I must give credit to my girlfriend Helene (aka 2amScrapper), because she put it in her New Year's Resolutions to do the Tim Tags.  When I saw her post, I remembered I wanted to try some Tim Tags.
Here it is....a little Different of course...because I got to things my own style...LOL.
Pin It!
You know I am a last minute kind of gal, although I am trying really hard to get things done ahead of time (I already have my RRR project done for Friday...wooo hooo)!
I stopped by Joann's and Michael's to pick up some of the #8 tags Tim uses, and some distress stains (specifically the metallic)..and of course they didn't have them...LOL.  Go Figure!
I did get the tags.  I cut the top of my embossing folders...what a smart guy he is...although I didn't use the same one (I have the one he used..just didn't feel like using it).  I inked the tag with Worn Lipstick, Barn Door and Vintage photo distress inks (my fav color combo).  I then used a tiny mister to add some water, used my Heat it tool and I was good to go.  Next I found the letter "h" from one of Ranger's grunge board pack (right now my stuff is a mess...so no time to look for the plain grunge board I know I have).  I used distress stain in vintage photo, then used my Ranger sander.  Next I applied some ranger embossing powder in Seafoam, and then did some more sanding then added some Perfect pearls mist in Heirloom Gold.  Did a little more sanding.
(I know I keep saying this..but I really need to get new glasses, because I had no idea there were glue strings stuck to my Burgundy leaves...LOL...which are from Really Reasonable Ribbon.    I took the The vintage seam binding in cream (also from RRR), and stamped it using Archival Jet Black ink from Ranger, using one of the stamps that I drew out and carved myself.  I then spritzed it with Butterscotch mist from Ranger.
I used a Ranger die, cut it in half (swirls one), and did the same technique I used on the letter "h", but this was some recycled paper that was sitting next to me on the floor (you know I can be lazy that way).  I sanded it and had LOTS of fun..LOL.
Tim cut out a piece of extra tag, and I decided to use some left over pieces from the collage sheet that I made for my Bff's Valentine's Day card....you can see the card here....and get the collage sheet here.  You can see in the photo here a couple more stamps that I drew and carved...again I used the archival jet black ink from Ranger.  I also decided to outline my heart with some perfect pearls in perfect copper.  I simply used a perfect medium pen, drew on my lines, used the brushes from ranger to apply and take off the excess.  Then I added a metal flower....I have gears...but I like flowers better :0)
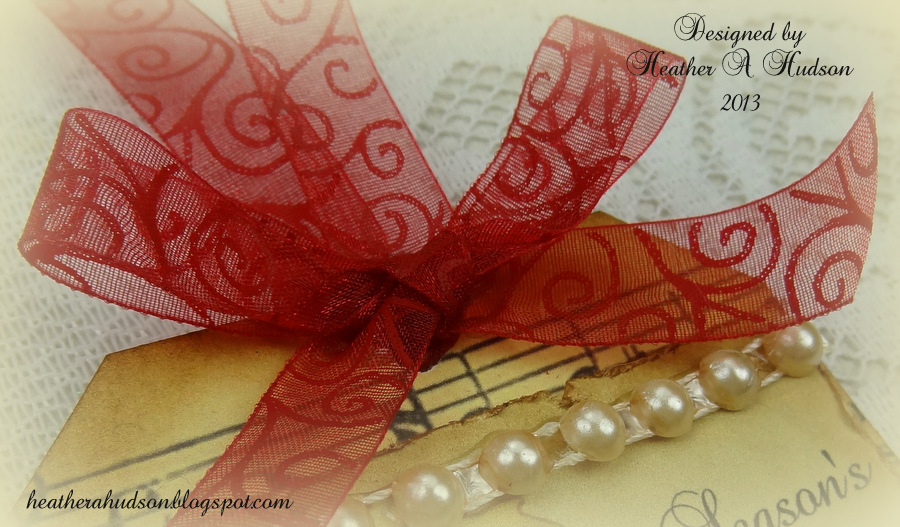
I added some of the film strip to the lower right, as well as to the upper left of my tag.  I used that fancy red tape stuff he used that I have sitting in the package...not opened.  That is some great stuff!  Very easy to peel off the red tape (why didn't you guys tell me this...lol).  Of course there are some of my favorite Champagne pearls to the left :0).
Abover you can see a few spots..and part of the "h" and of course the text boxes as well as a touch of my favorite Juliet Lace.  
Here is another photo of the whole tag.
I forgot to mention I used some tiny metal clip ..didn't have the same one's Tim used...but I believe I will be getting some. 
So...Thanks to Helene...and my BOLB Carol...for reminding me that I wanted to try a Tim tag...even if it is Heathery.

Thank you Tim...I had a Great time playing!

I will be sharing with the
Thank you for visiting!!
Hugs!!
Heather

Tuesday, January 29, 2013

Christmas in the Bank "Sandi's Challenge"

Hello Friends!1
Happy Tuesday!!
I am so excited to share with you something that one of my bestest buddies Sandi came up with.
 (Actually Sandi was the first person that I met...that gave me the opportunity to be part of a Design Team.  Now...I was not on the actual DT, but I was helping her with  her group, which lead to me being on my first DT at Bella Creations.  Some of you may remember that.  It is a group of galz I have stayed close with).
It is called
She has all the details of it on her blog. I think it is worth your time to read her post!!
Her first challenge is to crate at least a dozen Christmas tags.
Here is my first set of tags, I have created.  I will share the rest of my tags through out the next couple days.
Pin It!
I found a Christmas image from Karen the Graphics Fairy.
I used GIMP to create a Christmas Tag Collage sheet.
If you refer back to my photo of my 3 finished tags above, you will see that in the collage sheet you get "2" larger tags, "1" medium and "1" small tag.  
Here are the medium and small tags.  I used Ranger's Distress inks in peeled paint, and vintage photo.  I also distressed the edges with my kraft knife.  I did simple embellishments.
Above is a close up of the top of the larger tag....and Below is a close up of the bottom of the large tag.
These are just 3 of my 12 tags (which I will share the rest through out the week).
I hope that you will see that by taking part in Sandi's Challenge we are all winners...and that when Christmas comes next year...we will all be ahead of the game!  
Actually I have decided that anyone who goes to Sandi's blog...and participates in the challenge, will be placed in a Random drawing...and will win a free digital collage sheet of their choice from my Etsy store.  
So...hop on over and visit Sandi's blog.
I have even put a
video to show you how to link up to Sandi's Challenge via her comments.  

So check it out...you may find this useful for other reasons.
I will be sharing with
Thank you for visiting!!
Hugs
Heather

Sunday, January 27, 2013

Shabby Tea Room Week 150 Just Pretty & "Free Collage Sheet"

Hello Friends!!
Happy Sunday Evening!!
Today I had some time to play.
I just happen to visit the
Shabby Tea Room
and noticed there was an hour left till I could link up a project.  I have not had a chance to play in any challenges other than the ones I design for.  Hopefully later this week, life will get back to normal, and I will tell you all about my past 4 weeks.
So the theme in the Tea Room is 
"Just Pretty"
what a Gorgeous photo for inspiration!
So I quickly created a collage sheet, cut it out and threw on some embellishments!  Nothing like last minute if you know what I mean!
I had 8 minutes to spare.  
Here is my creation.  We were asked to use stripes, a flower and colors from the inspiration photo.
I used GIMP and a pink and ivory colored background, added the rose, and created the text box that says "beautiful."  
Inked all my edges with Vintage Photo by Ranger.
I used the Juliet Lace, Pink leaves, champagne organza, and pink striped ribbon all from Really Reasonable Ribbon!  I also used the Candi Fix it foam pads.
Here is a close up of the bottom.
Since this was put together so quickly...the collage sheet did not take much time, so you can have it as a freebie to use in your own personal works.  The rose image is one I found at
 The Graphics Fairy.
Not for resale.  
(unless you are my bestest friend Ginny..who can use it for what ever she wants...lol).
Just right click and "save as"

I will be sharing with 
Make it Monday:  Anything Goes
Brag Monday at the Graphics Fairy
Thank you for visiting!!
Hugs!!
Heather

Thirty Days of Valentines at Gecko Galz

Hello friends!!
Happy Sunday!!
Today is my turn to be featured at Gecko Galz for the 30 days of 
Valentine's Day Cards Inspiration!!
Here is the card that  I originally designed for this event 
(I had posted mine before I realized that we were to wait till our specific date).
To see all the goodies I used on this card, please visit my post here.
I thought I would go ahead and create another card using some Goodies from Gecko Galz and Really Reasonable Ribbon!
(as if you didn't expect that...lol) 

I used one of the Color Me Jewels Collection images.  I used GIMP, to change the background color to a pink.  I used the Star Crossed Digital Paper for the background...and an image from the Bits and Pieces Ephemera set.  I of course used GIMP to create the heart shape and sizes of all of my pieces, so I could cut them all out and fit them on a 5 by 7 ivory card blank (I am getting smarter...got that idea from my BFF Ginny).
The digital images are from Gecko Galz.
Here you can see how I inked the polkadot ribbon.
Flower tutorial here.  
I thought I would go ahead and share with you some of the other Valentine's Day Cards I have made recently using Gecko Galz images, some images of my own, and Ribbons and Trims from ReallyReasonable Ribbon!
This is my Pocket full of Love tags.  You can purchase the digital tags that I designed at Gecko Galz, and see a list of all the goodies I used here (as well as close ups).
Digital stamps from Gecko Galz and Really Reasonable Ribbon trims and ribbons.  Get the details here.
I used the same digital collage that I created from Gecko Galz images in this tag on the left side of my blog background...just in case you were wondering if it looked familiar....LOL.
You can learn more about the ribbons, trims and images used here.
This is one I did for my BFF...she loves Pugs.  You can get the details of all the goodies I used here.  
I created the center collage myself...then used some images from Gecko Galz....and of course Ribbons and trims from RRR.
Here is a card I posted yesterday.  I am super happy with how it turned out!!
How about a blast from Valentine's Day Past?
My Vintage Valentine Mini Album.  If interested you can see all the deets here.
Here is a heart shaped card.

You can see the front of it here.

These photos were taken with a tiny video camera....because I had broke my regular camera....what a nightmare...LOL.  You can see the hidden heart tag..and all the details here.
Hopefully something I have posted here will inspire you to create a Valentine's Day card or creation of your own!!
Thank you for visiting!!
Hugs
Heather

Saturday, January 26, 2013

Sugar Creek Hollow Week 46: Lots of Layers


Hello Friends!!
Happy Saturday!!
It is week 46 at Sugar Creek Hollow, and this week we would like to see you use "Lots of layers" in your vintage or shabby chic style cards. Things have still been super busy for me, hopefully this time next week, things will be back to a "so called normal."  
I think for the first time, I created something to take my mind off things.  It worked :0)
  Here is a picture of my project below.
Pin It!
I used some fabulous images from Gecko Galz, and fabulous ribbons and trims from Really Reasonable Ribbon, to create a bunch of lovely layers.
I started out with a 5 by 7 card base, inked the edges with vintage photo.  Next I used the Star Crossed digital paper, "St. Valentine's Greetings" image and Two to Tango images from Gecko Galz.  Now of course my images will look slightly different, because I used GIMP to create the specific sizes that I wanted for my card.
I distressed and inked all my edges with Ranger's Photo, created my own "sentiment" in GIMP, and used some pearls from my stash as well as some of my favorite goodies from Really Reasonable Ribbon.  Burgundy leaves, old gold diamond ribbon, pink lace, candi fix it foam pads and newsprint candis.
I created a simple flower to the left with the ribbon, and a rosette.
I used the fix it foam pads to elevate my text boxes and newsprint candis.  You can also see I created another layer with one of my favorite punches. 
I used the Baroque Script Font for my text boxes.
Here is a closeup of the Victorian boot image from the Bits and Pieces Collage sheet at Gecko Galz.
I can't wait to see all your luscious layers on your
Vintage or Shabby Chic style cards that you link up to 
 Sugar Creek Hollow this week!
Thank you for visiting!!
Hugs!!
Heather

Saturday, January 19, 2013

Sugar Creek Hollow "Tic Tac Toe" Week 45


Hello Friends!!
Happy Saturday!!
We have an exciting challenge for you this week at 
Sugar Creek Hollow!
It is week #45 and we are playing "Tic Tac Toe!"

Cec created this fabby photo below ...where you can chose what three elements you would like to use in your Vintage or Shabby Chic style card this week!
Tic-Tac-Toe
I chose the lace, ribbon and pearls.  
Here is what I came up with below.
I have little pieces of lace, ribbons and pearls throughout my card.
Pin It!


  I used GIMP and some copyright free images I found on the internet to create my Valentine Collage image.  All pieces (including ribbons and lace) were inked with Ranger's Vintage photo.
I used an image of Abe Lincoln, with some flowers,  an Elephant, and a top hat.  Got rid of all the "stuff" I didn't want, and created the little ensemble above.  I love elephants!  The whole idea that they "never forget"...so I thought it would be fun to create this card...Especially in patriotic themes, so you will be seeing part of this again around July...LOL.
I used the Emporium Capitals font to create my text boxes, as well as pulling colors from my image to create the backgrounds.  You can see above how I elevated the text boxes and heart using the candi fix it foam pads (RRR), which allowed me to easily place the golden yellow pom pom trim (RRR) around my heart.  

The 10 cents image, and the word "Heart" image are from
Gecko Galz.  
Here is a close up below of the bottom little cluster.  I used GIMP to add the word "Kisses" to the image.
Here is a close up of the top cluster.  I used some pink mulberry roses, and ivory pearl trim from my stash...as well as the fabby ribbons from this months assortment from Really Reasonable Ribbon.
Please make sure to stop by the Sugar Creek Hollow blog to see the fabulous creations from the rest of the Design team as well our 
Guest Designer Heidi
please stop by her blog and leave her some love!!