
Here are a few steps I used in making my collage.
First I found my images over at the
Graphic Fairy.

I love these finches and the teacup.
 The next step was to open these images in GIMP and do a little
image manipulation. I painted the cup, and chose just the chick's heads and some of the forget me nots.
Next I used my Silhouette SD's print and cut feature to cut out my design. Here are some of the pieces below.
 The Bingo Template I designed
and shared in an earlier Bingo Card Post.
This time I decided to use one of the many boxes I have collected.
I just cut a flap off a box, and I trimmed it a little. All my pieces for this were printed on paper that I had used the other side for something else or scraps left over to be punched. So this is kind of my "green" project. I even have used that plastic wrap a few times..lol.
Here is what I used on the background.
 First I painted my background with Delta acrylic paint in Lisa pink. I am not truly a "pink" person...but when this is inked..it looks a little more coral in color...which is one of my favorites. I just painted the edges, since they are all that are going to show.
Next I spritzed on all three of my mists. Quite a bit too. I crumpled up a piece of plastic wrap, and then gently undid the crumple, and laid it on top of my cardboard piece.
 It is fun, the sparkles tend to gather in the wrinkles of the saran wrap (in my case plastic food safe wrap from Sams club going on 11 years now...we now live by a Costco). I only showed one corner so you could see what I mean about the glitter in the wrinkles.
 After I hit this with my heat gun...because no time to wait for drying. I removed the plastic wrap. So I have this awesome look, that kind of sparkles.
I just GLUED on all my pieces. Nothing special here.
Then let it all dry.
I finished it off by taking some watered down Raw Umber acrylic paint, and brushed it all over my project. Then I simply used an old cotton tshirt to rub the paint around, remove some...etc.
 After I added the antiquing, I added my flower, Dusty attics piece and butterfly.
 I used the Bella muse image from this month's Challenge at
February Collage...Two Ways
over at Bella Creations.
I threw in some of the roses I painted too.
 Here is that Fabulous dress form that I created with my Teresa Collin's Stamp maker. I was quite impressed with the amount
of detail! I drew out my design and I really wasn't sure to expect. It turned out perfect!
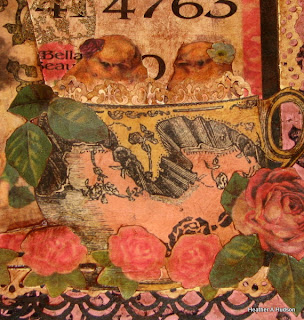 This piece came about when I saw the cute little finches in that umbrella and then the tea cup. I instantly thought of
Shawn...Micupoftea. So this represents Shawn and I
chatting about inking, stamping and enjoying friendship
and a great cup of tea. I do have the leaves on the cup
to represent (for me anyways)..that Shawn is my favorite tea snob..and only drinks "Loose leaf"...that is way cool.
OOPS! A Random Thought Moment....
I have thought of doing one with my best friend and I
but unfortunately it would have to be
seagulls...flying around a discarded
Wendy's Sea Salt covered Fry Box. In the parking lot at
Polly's Paper Studio (her store...no ...her name is not Polly). You will see her comments as VIRGINA. We share the same
humor. I could possibly throw in a Little Ceaser's
breadstick package...LOL. We love those too. If her DH is
by some strange reason reading this...we would never eat either of the mentioned above.
That just didn't seem to
lend itself to Beauty...LOL.
Random thought is over...please continue on
Here is a close up of the flower I made using scraps.You can also see the
Dusty Attics chipboard. I LOVE that stuff! Here I added some pearls that the colors were something I would never use. I simply embossed the whole thing, pearls too, with Heirloom gold embossing powder. I added this to some of the leaves on the flower and that is what I used on my dress form stamp.
 I decided to add numbers to my bingo card. It was hard for
me to do. Is that two many "3's" next to each other..LOL
Are the numbers "Random" enough.
LOL
Thanks for visiting!
Hugs!
Graphic Fairy.

I love these finches and the teacup.

image manipulation. I painted the cup, and chose just the chick's heads and some of the forget me nots.
Next I used my Silhouette SD's print and cut feature to cut out my design. Here are some of the pieces below.
and shared in an earlier Bingo Card Post.
This time I decided to use one of the many boxes I have collected.
I just cut a flap off a box, and I trimmed it a little. All my pieces for this were printed on paper that I had used the other side for something else or scraps left over to be punched. So this is kind of my "green" project. I even have used that plastic wrap a few times..lol.
Here is what I used on the background.
Next I spritzed on all three of my mists. Quite a bit too. I crumpled up a piece of plastic wrap, and then gently undid the crumple, and laid it on top of my cardboard piece.
I just GLUED on all my pieces. Nothing special here.
Then let it all dry.
I finished it off by taking some watered down Raw Umber acrylic paint, and brushed it all over my project. Then I simply used an old cotton tshirt to rub the paint around, remove some...etc.


February Collage...Two Ways
over at Bella Creations.
I threw in some of the roses I painted too.

of detail! I drew out my design and I really wasn't sure to expect. It turned out perfect!

Shawn...Micupoftea. So this represents Shawn and I
chatting about inking, stamping and enjoying friendship
and a great cup of tea. I do have the leaves on the cup
to represent (for me anyways)..that Shawn is my favorite tea snob..and only drinks "Loose leaf"...that is way cool.
OOPS! A Random Thought Moment....
I have thought of doing one with my best friend and I
but unfortunately it would have to be
seagulls...flying around a discarded
Wendy's Sea Salt covered Fry Box. In the parking lot at
Polly's Paper Studio (her store...no ...her name is not Polly). You will see her comments as VIRGINA. We share the same
humor. I could possibly throw in a Little Ceaser's
breadstick package...LOL. We love those too. If her DH is
by some strange reason reading this...we would never eat either of the mentioned above.
That just didn't seem to
lend itself to Beauty...LOL.
Random thought is over...please continue on
Here is a close up of the flower I made using scraps.You can also see the
Dusty Attics chipboard. I LOVE that stuff! Here I added some pearls that the colors were something I would never use. I simply embossed the whole thing, pearls too, with Heirloom gold embossing powder. I added this to some of the leaves on the flower and that is what I used on my dress form stamp.

me to do. Is that two many "3's" next to each other..LOL
Are the numbers "Random" enough.
LOL
Thanks for visiting!
Hugs!
Hurrah! I get to be 1st to comment~
ReplyDeleteOk, you crack me up, Lady of the Roses! You keep telling everyone that I'm a 'loose' woman...but that is ok, because I would rather be that than a 'bag' lady! haha! If I squint the leaves DO rather look like camelia sinensis (the tea plant from which my daily heavenly elixir comes from!) Love this little work of art, especially the coat of raw umber which gives it a great overall antique vibe. All your details are wonderful, as usual. Watch out for those seagulls and their 'gifts' from above! chirp, chirp~ I think I like sitting in a cozy teacup. xoxo
Yayy!!! Is this my Christmas card?????
ReplyDeleteGorgeous Heather! Always like seeing your artistic creations! Love all the detail you put into it!
ReplyDeletethis is really cute!!!
ReplyDeleteloved reading all about your creative process! so happy you chose Shawn rather than Virginia for this work of art--nothing against this amazing woman and her wonderful Polly projects--I love it, I just can't imagine Little Ceaser's breadsticks and seagulls on this great project.
ReplyDeleteThis is simply gorgeous! Great work and thanks for posting it at Paper Issues!
ReplyDeleteFabulous, I love all the elements. Thanks for linking up to PI!
ReplyDeleteVery sweet!
ReplyDeleteVisiting from the Graphics Fairy. TFS!