Hello Friends!!
I hope you all had a wonderful holiday! Before I forget, you don't want to miss Bonnie's Fabulous
Really Reasonable Ribbon End of Year Sale!
Today I have a Vintage Style Tussie Mussie that I would like to share with you.
I used some fabulous ribbons and trims from Really Reasonable Ribbon to dress it up!
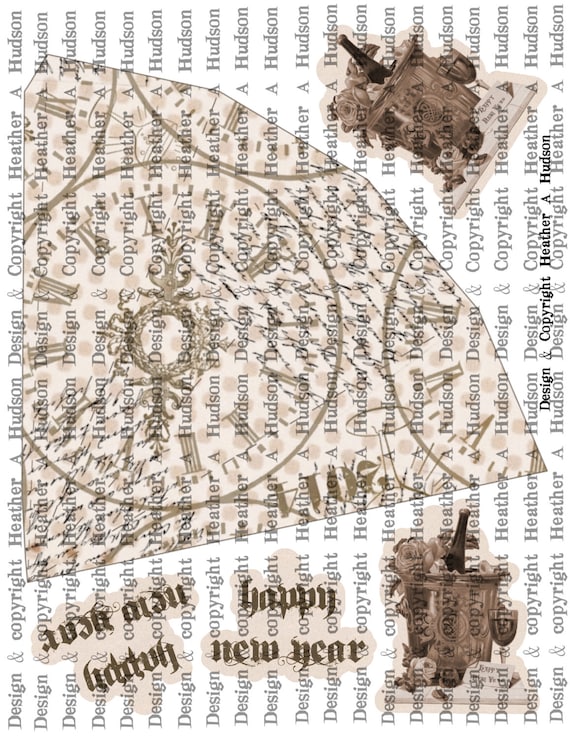
Here is the collage sheet that I created for my cone. You can find it in my etsy here.
 You can start out with the Collage Sheet that I designed, or create your own cone. You will need to cut out your pieces. Using a scor tool line up the point of the tussie mussie with one of the grooves, make sure the dashed lines fall into that groove, and score your Tussie Mussie. You will need to do this 4 times. Next you will need to ink the folds and edges with Ranger's Frayed Burlap Distress ink.
Apply your Art Glitter Designer dries clear Glue with your Ultra fine Metal Tip to the tab, and adhere the flap to the last segment to create your Tussie Mussie. You will also need to punch holes in the sides and in your focal pieces.
I used a 24 inch piece of the Silky Crush Champagne Ribbon (a new Fav) for my hanger. I tied a not on either side and left enough of a tail for the pieces to look elegant.
Around the top of my Tussie Mussie, I have a few layers, starting with the Satin Double Ruffle Ivory Ribbon, then my Fav Juliet Lace followed up with a layer of Mini Ivory Pom Poms. I also embellished the center top with a 20mm Deep Ivory Mulberry Rose and some White Leaves that I inked with Faded Burlap Distress ink.
Layer One
Layer Two
You can start out with the Collage Sheet that I designed, or create your own cone. You will need to cut out your pieces. Using a scor tool line up the point of the tussie mussie with one of the grooves, make sure the dashed lines fall into that groove, and score your Tussie Mussie. You will need to do this 4 times. Next you will need to ink the folds and edges with Ranger's Frayed Burlap Distress ink.
Apply your Art Glitter Designer dries clear Glue with your Ultra fine Metal Tip to the tab, and adhere the flap to the last segment to create your Tussie Mussie. You will also need to punch holes in the sides and in your focal pieces.
I used a 24 inch piece of the Silky Crush Champagne Ribbon (a new Fav) for my hanger. I tied a not on either side and left enough of a tail for the pieces to look elegant.
Around the top of my Tussie Mussie, I have a few layers, starting with the Satin Double Ruffle Ivory Ribbon, then my Fav Juliet Lace followed up with a layer of Mini Ivory Pom Poms. I also embellished the center top with a 20mm Deep Ivory Mulberry Rose and some White Leaves that I inked with Faded Burlap Distress ink.
Layer One
Layer Two
Layer Three
At the top of my focal I tied a bow with some Antique Gold Organza.
I created my handle with some lovely Silky Crush Champagne Ribbon (a new Fav). I also created some Tripple bows with my Bow it All and Havana Brown Seam Binding. I placed one on the left and right sides of my Tussie Mussie. Then a Double Bow on the front bottom. Each of the bows were topped off with a 20mm Deep Ivory Mulberry Rose.
Another look
Another Look
Art Glitter Designer dries clear Glue was applied to all the edges of my pieces and rose petals with the Ultra fine Metal Tip and #73 Platinum glitter was applied.
Here is a look at the center
Sorry my printer was acting up so my focal piece has a few lines in it where it printed an off color...and the next photo the lighting is not that great because it is dark out and snowy....just know it is much more beautiful in real life.
I hope you enjoyed my tutorial. You could fill the tussie mussie with Confetti, or yummy snacks.
Thank you for visiting us at Really Reasonable Ribbon today!!
Hugs!!
Heather


those are just beautiful....thanks for sharing.
ReplyDeletemilissa
Gorgeous! Happy new year!
ReplyDeletethank you for this beauty!!!
ReplyDeleteSuper pretty! Wonderful fussy Tussie Mussie...love all those bows!
ReplyDeleteLoving that double ruffle ribbon too, and it looks great with your favorite Juliet on top!
BOLB Hugs!
I love your style, Heather! This is such a sweet little Tussie Mussie! Thanks for sharing the details with us!
ReplyDelete