Thursday, February 24, 2011

Lily's Baby Mini Album

My cousin Jordan and his DW Leslie
are having their first baby.
Here name is Lily!  I just love that name
I have spent the last couple days working on this
mini paperbag album. Not all day long of course :-)
Tonight at 11:23 pm...I called my mother
because I noticed that I had spelled 
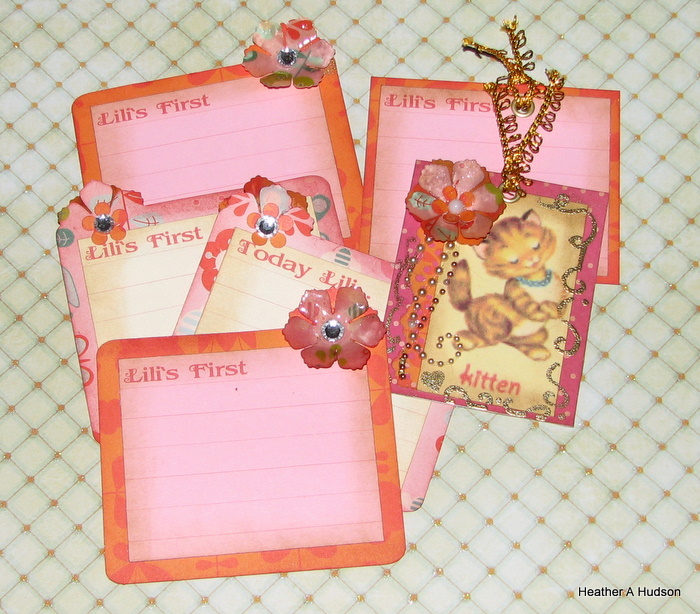
LILI...and LILY
Of course the tags all say
Lili's First....and it is supposed to be Lily's First...LOL
Here is a few photos before I do my fixes
My mom said to "Keep it simple"  So I did.
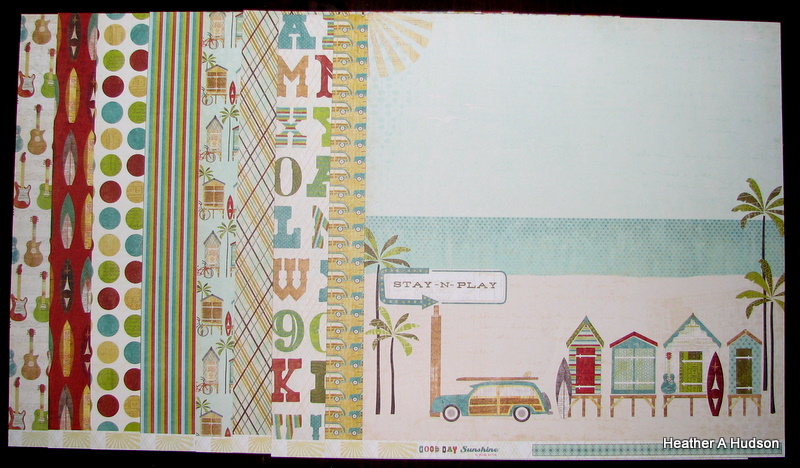
I used some fab papers by
Cosmo Cricket.  Which I got from
my BF's Store.
I will come up with something to fix these...lol.  
I did use UTEE on all the flowers.  I did keep them to just one layer (although the tags are shaped with the flower) of flower...so as to not get to bulky.
I inked all the edges with Vintage photo and Fired brick by Ranger.
Here are the flip sides
I have a tiny flower on the sides that would interfere with the Journal writing.  On these you can see that the tag has been shaped.
I tried to keep it girly and fun...and not very Heathery..Flowery...lol
Here the embossing says "Beautiful"..I will add some more leaves and some words on the other side..this Sunday.
These pretty pages can hold some baby Lily photos...as well as the tags below.  Again...simple...but cute!
They each have a photo mat on one side...and journal spots on the other.  I used one of my EK Success punches to add just a touch of vintage to the edges.

So..I will post some photos after I 
ALTER all my own tags...LOL.
Check back soon
hugs!

Friday, February 18, 2011

My First Lay out for Scraptales Design Team "Just the Boys"

I got these Fun "My Mind's Eye" set of papers to do my first Design Team layout....from Linda over at 
Scraptales
Just the Boys

I fell in love with the colors right away!
This collection is called:  Good Day Sunshine 
Here is one side....


Here is the other side.  I really do love the rich colors!
Perfect for a "Guy Page."


Of course when these papers show up at the store...I will have to get a couple more sheets.  :-).
I was also allowed to pick out three sheets of card stock of my choice to use with my layout.  Yay!  I chose  Core' dinations Core Colors.  I love to emboss these...then sand them to reveal the other color!  Super fun!  Who doesn't like distressing?


First off I knew I wanted to use this page with the cute little huts on the beach..and that Fab retro station wagon!  Love it!  
So to keep it simple, I just cut on the line across the page and around the last palm tree.  


I will also use some strips of the coordinating papers.  You can see them below.  You may notice that I have left the "name of the paper"  space that comes on our 12x12 sheets we love to play with. This way...I can use my ATG gun on that strip...and save the pattern for what will actually show, since I will be layering the papers!  I did end up cutting off the name strip from the red surf board paper at the top, because I will be layering the black "Core" card stock under this piece...and above the yellow/brown plaid. 


 So the "word strip" on the black card stock is attached under the red surf board paper.  I am building my page, will mount my pieces on another sheet of cardstock..so it will hang up better.  This way I can save my Patterned paper.
You can see how I have distressed each section prior to attaching them together.  I used my tiny Cutter bee scissors to distress the edges.  Then inked them using Ranger's Distress Ink in Vintage photo.  For large pages I would use the "Zutter Distrezz it all " tool. But these are pretty small pieces..so the Cutter Bee scissors work great!  You can see how I am attaching the papers to the my background cardstock.
I added the red patterned paper to the bottom of  the piece with the huts...and surfboards.  I love how this is turning out.  You can see the distressing better on this piece.


This was my second idea, where I would create a surf board shape to fit on top of the plaid paper, and add photos.  I showed my sons both options, and they agreed that they liked my original idea better (such smart little men...lol).  I let each of them pick out a piece
of patterned paper that they wanted for their 'surf board".  I created a "Pocket" on my page by using my ATG gun to tape only the left and right edges and bottom of the piece at the bottom with the beach huts and car on it.  The top was left alone...so that the surf boards could slide in as tags.
Gabe chose the stripe and Caleb the letters!  I still wanted one more  surf board, so I chose the really cute light blue with tiny beach huts on it.
I didn't want to waste any paper, so I drew out a surf board the size that I wanted.  Then I used my Silhouette SD to "Print and cut" my photos and photo mats, as well as journal tags.  You can see them below.  Why the Silhouette SD?  I can use the Silhouette Studio program to place my pictures on my "cyber mat" and send this information to my printer to be printed.  The three "L shaped" marks in the corners of my paper are called "Registration Marks."

Now I can place this on my Silhouette mat and place it in my machine.  The Silhouette works like a plotter in that it "registers" or "reads" the registration marks, and knows where to cut.  You will notice that no cut lines are printed...they are just cut out.  Here are the journal tags below.


Now my Silhouette will do the work of cutting these pieces out.
I used the "offset feature" to form a shaped bubble around my words.  I used a plain (not textured) pieces of ivory card stock and black cardstock from my stash for the journaling and mats.
Here is my finished piece.  I just LOVE how it turned out!
Both my boys Love it too.  The DH 
liked the idea that it wasn't a "Flowery Page."


Here are some close ups.


So besides using Ranger's Distress ink in Vintage photo on all my paper pieces, I also used the following items:
We R Memories Crop O dile and Grommets   
Ranger's Perfect medium ink pad and Pen
Ranger's Perfect Pearls in Perfect Bronze
Perfect Pearls Brushes
UTEE by Suze Weinberg.
Tim Holtz  Rays and Retro Circles Embossing Envelope
Tim Holtz sander
ATG Gun and 3M Adhesive
Art Glitter Glue in Clear
I used the Perfect medium pen to color all the roof's of the huts, leaves and trunks of trees...and the sun piece...then covered with UTEE and melted using my Ranger's Heat it craft tool.  I used the perfect medium ink pad for the "just the boys banner" and then cover it in UTEE and melted as well.
I did some random outlining of the edges with the Perfect medium pen and then used the brushes to apply the perfect pearls.
Here is a photo of the Surf board tags out of the page pocket.


Please feel free to leave me a comment if you have any questions.
Thanks for visiting, and I hope to have some more projects on my blog on Monday,  All my samples will be at 
Scraptales on Tuesday.
Thanks for visiting!
Hugs!


How Lucky am I..to have such Talented friends!

I have been so busy lately.
I finally have my own car back
and got a new SD card.  So I thought
I would take some photos of some of the Goodies
that I have gotten in Swaps from
Bella's Creations.
My first Beauty is the Fabulous Valentine Card and box that
I received from STARR...one of the DT memebers over at Bellas.
I was sooo lucky!
 Look at all the fabulous punch work!  The flower made it to me...all nice and fluffy!
Here is the inside. Vellum!  Yum!  It looked like Chocolate
writing to me...I wanted to lick the card...I did try the ole
scratch and sniff...but no Chocolate...just Beauty!
Beautiful!  But there is more!
It came with this sweet little heart shaped box too!
Look at all those tiny pieces...all glued on..individually.  My fingers 
just don't work with tiny!  This is Super Fab!  I feel so Special!
Isn't that just the cutest trim?  I LOVE it!
That is not all....there is more!
Sweet little Valentine Goodies!  Yay!
Thank you Starr!


Okay...now for what my friend SANDI sent,
also a DT member at Bella Creations.
This was a swap of 20 items...that you just pick from
your stash and send to the person that you were given.
I am sending to Marlene...who lives in Canada...far ..far...away.
I sent her package on Jan 28th, and who knows when she will get it.
Lesson learned...priority mail.
It is a little hard to tell...but there is bling, ribbon rolls and roses...and brads..and more flowers...and Fabulous Vintage FRAME!  WHICH I LOVE!  Some pretty Chic
metal pieces...and some tassels!
Look at those Fabulous RED flowers!  They are huge!
Obviously Sandi must think we are good FRIENDS
and BUDDIES...and I have the BLING to prove it!
(couldn't resist)
Thank you Sandi!  I sure hope you and 
Marlene get your packages soon!  Who knows
they could end up being "time capsules"...lol.


Up next is the Last minute Mini album Swap that
Carol and I decided to do.
Here is the cover of the Fabulous Mini Album she has done for me!
Truly Beautiful!


The colors are Fabulous.  So Soft and Romantic.  The inside is full
of all kinds of great little beauties!  When I have more time, I will 
get photos of those too!  I wanted to make sure you could see her 
AWESOME binding!  I just love it!
I love how the beads hang on the ribbon.  So beautiful!
Here is a shot from the top.
GORGEOUS!


She also sent me a Fabulous card too!  Isn't that the best image?
Love that lace and pearls!  Of course one of Shawn's love tickets!


So..of course I am behind..I have to finish her album...lol.


Sorry...Ginny..none of these are your Christmas Card...LOL.


Last and not least my BF Ginny
(who I gave one of my Christmas cards that didn't quite turn
out how I wanted...and someone at her store talked her into selling it to them ...that is when you know you are BF's because she knows I don't care if she sold it ....as long as she was able to get some Fries out of the deal...lol).  
I still owe her a Christmas Card....and now a Valentine Card...LOL.
(you will see her comments sometimes asking these questions...lol).


I received this Gorgeous tag (what Ginny and I call .."Heathery style"), tag.  It is all things I love!  Vintage look, lace, buttons and roses...and some pink!
So I am not signing up for any swaps this month so I can finish my 
IOU's.


Thanks for visiting me today!
Feel free to send me some beautiful goodies...LOL.
Hugs!

Friday, February 11, 2011

February "Bella" Collage 2

Here are a few steps I used in making my collage.
First I found my images over at the 
Graphic Fairy.

I love these finches and the teacup.  
The next step was to open these images in GIMP and do a little 
image manipulation.  I painted the cup, and chose just the chick's heads and some of the forget me nots.
Next  I used my Silhouette SD's print and cut feature to cut out my design.  Here are some of the pieces below.
The Bingo Template I designed
and shared in an earlier Bingo Card Post.
This time I decided to use one of the many boxes I have collected.
I just cut a flap off a box, and I trimmed it a little.  All my pieces for this were printed on paper that I had used the other side for something else or scraps left over to be punched.  So this is kind of my "green" project.  I even have used that plastic wrap a few times..lol.
Here is what I used on the background.
First I painted my background with Delta acrylic paint in Lisa pink. I am not truly a "pink" person...but when this is inked..it looks a little more coral in color...which is one of my favorites.  I just painted the edges, since they are all that are going to show.
Next I spritzed on all three of my mists.  Quite a bit too.  I crumpled up a piece of plastic wrap, and then gently undid the crumple, and laid it on top of my cardboard piece.
It is fun, the sparkles tend to gather in the wrinkles of the saran wrap (in my case plastic food safe wrap from Sams club going on 11 years now...we now live by a Costco).  I only showed one corner so you could see what I mean about the glitter in the wrinkles.
After I hit this with my heat gun...because no time to wait for drying.  I removed the plastic wrap.  So I have this awesome look, that kind of sparkles.
I just GLUED on all my pieces.  Nothing special here.
Then let it all dry.
I finished it off by taking some watered down Raw Umber acrylic paint, and brushed it all over my project.  Then I simply used an old cotton tshirt to rub the paint around, remove some...etc.
After I added the antiquing, I added my flower, Dusty attics piece and butterfly.
I used the Bella muse image from this month's Challenge at
February Collage...Two Ways 
over at Bella Creations.
I threw in some of the roses I painted too.  
Here is that Fabulous dress form that I created with my Teresa Collin's Stamp maker.  I was quite impressed with the amount
of detail!  I drew out my design and I really wasn't sure to expect.  It turned out perfect!
This piece came about when I saw the cute little finches in that umbrella and then the tea cup.  I instantly thought of 
Shawn...Micupoftea.  So this represents Shawn and I 
chatting about inking, stamping and enjoying friendship
and a great cup of tea.  I do have the leaves on the cup
to represent (for me anyways)..that Shawn is my favorite tea snob..and only drinks "Loose leaf"...that is way cool.


OOPS!  A Random Thought Moment....


I have thought of doing one with my best friend and I
but unfortunately it would have to be 
seagulls...flying around a discarded
Wendy's Sea Salt covered Fry Box.  In the parking lot at 
Polly's Paper Studio (her store...no ...her name is not Polly).  You will see her comments as VIRGINA.  We share the same
humor.  I could possibly throw in a Little Ceaser's 
breadstick package...LOL.  We love those too.  If her DH is 
by some strange reason reading this...we would never eat either of the mentioned above.
That just didn't seem to
lend itself to Beauty...LOL.


Random thought is over...please continue on


Here is a close up of the flower I made using scraps.You can also see  the 
Dusty Attics chipboard.  I LOVE that stuff!  Here I added some pearls that the colors were something I would never use.  I simply embossed the whole thing, pearls too, with Heirloom gold embossing powder.  I added this to some of the leaves on the flower and that is what I used on my dress form stamp.
I decided to add numbers to my bingo card.  It was hard for 
me to do.  Is that two many "3's" next to each other..LOL
Are the numbers "Random" enough.
LOL
Thanks for visiting!
Hugs!


Thursday, February 10, 2011

Filling Text/Changing outline color of Text with Silhouette Studio

I am having too much fun creating this screen shots with JING.  What a great FREE program.
You can find JING here.
You lets you capture an image on your screen, add text and arrows.  Super fun!
I did this tutorial just in one picture.  So just follow the arrows to use the options you need.  Later today I will post it in steps.
I did leave this full size, so just double click...and you can actually read it...:-)
Thanks for visiting!
Hugs!

Wednesday, February 09, 2011

How to eliminate the outline of an image with the Silhouette Studio program

While visiting my Silhouette group on Flickr
I noticed some girls were having the same
issues I had to work out.  So I thought I would try and help
Here are two photos below that walk you
through deleting the original image's outline.  Then you can use the 
"find the outline tool" to get your actual cut line.  
If you double click on the image, it will enlarge.
Here is the next image.
I sure hope this helps!  I love using my Silhouette SD.
If you would like to see more of these...just leave a comment.
Thanks!  Have a great day?
Hugs!

Saturday, February 05, 2011

My first Stamp with the Teresa Collins Stamp maker

I finally got around to using my
Teresa Collins stamp maker.  Here is my first stamp.
Sorry...I will post a picture of the actual stamp image. 
(not sure how I forgot that).
I was pretty impressed with the results!
I will add the image later!
Thanks for visiting!
Hugs!

Friday, February 04, 2011

February "Bella" Collage

Hello Bella Beauties!
Here is the start of my 
"February Collage Project"
I did do one project, but I was antiquing it...and it is too dark.
So I am re-doing it.
(multitasking while antiquing= not a good idea)

Here are some of the images I will be using.
The first step will be to do a little drawing with a regular crayon.
You can see how I drew a simple flower on the bingo card (I will be changing what I do on my new one...lol..but I will use a crayon).
I also drew some circles on my tea cup.  When I ink these, the crayon will still show, and resist the ink. 
Think "Easter egg coloring and dying."

I also did some stamping.  Remember if you are going to using collage medium of some type, distress inks will smear.  You will want to use Stazon inks.
Okay...I will post more later!
Thanks for visiting!