Sunday, November 30, 2014

10 of my Favorite Projects using Chipboard

Hello Friends!!
The other day I just happen to run across the
 Design Team Call at Imaginarium Chipboard through Facebook, and I figured it would not hurt to try out for their Design Team...who wouldn't want to have some fabulous Chipboard to play with!!
Here are my 10 Favorite Projects using Chipboard.

#1  My most favorite Chipboard project is My Mother's Day Card.

Here is a close up of the Chipboard piece.  
It was hand painted to look like a fancy basket of rose buds, glossed and then embellished with Liquid Pearls.

#2 My "Parent's Renew Wedding Vows"  Lay Out
I just loved playing with the chipboard on this layout.  I had all of these scraps and the negative pieces left over, so I decided to emboss them all in a beautiful Gold color and then embellish the pieces with transparent champagne colored glass seed beads.
Here is a close up of one of the negative pieces (used at bottom of photo) and border pieces (across the bottom of my LO page).
#3 Vintage Inspired Easel Card
 Here I went simple but created a statement using Gold Embossing Powder on the word "handsome" and Scroll work piece upper Right.

#4 Layout that I did of my Beautiful Boys
I did this piece for my Local Scrapbook Store.  The large chipboard frame was covered with patterned paper, then stamped with a stamp I carved.  Next I doodled on it with a Perfect Medium Pen and embossed it with Perfect pearls gold powder.  Finally I painted a Rose and leaves in the lower right corner.  UTEE was used to give it a glossy Victorian feel.   The inner square chipboard frame (set on point in photo) was covered in torn paper, stamped and covered in UTEE.
Close up of Rose and Scrollwork Chipboard piece.
The Scrollwork was painted cream, then shaded with brown.  Covered in UTEE and then embellished with Liquid pearls.
#5 Mother's Day Layout
Butterfly chipboard in upper Right, and Mother's day sentiment, as well as the large scrolls were all hand painted to match the color of the paper.  The butterfly was shaded with paint, then embellished with liquid pearls.  Again I used a Perfect Medium Pen on the Mother's day Sentiment, and embossed with gold perfect pearls powder.
Additional layers of comma strokes of paint were added to the scroll pieces and topped off with dots of liquid pearls to add depth.
#6 Looking for the Siren Lay Out
 The scroll chipboard pieces reminded me of Splashes of water...so they were painted blue, then shaded and highlighted.  Glitter was added and then I covered the chipboard pieces in UTEE.  
Close up of one of the Chipboard Splashes.
#7 Chipboard pieces from my Garden Layout
Butterfly embossed with Gold Embossing Powder.
  Centers of Dragonflies embossed with Gold embossing powder.  Wings embossed with Red embossing powder. 
#8 Believe Sign (beauty)
Sign painted.  "Believe" chipboard covered with paint and then covered with transparent glitter.  The letters outlined with glue and then I applied darker green glitter.  
Close up below.
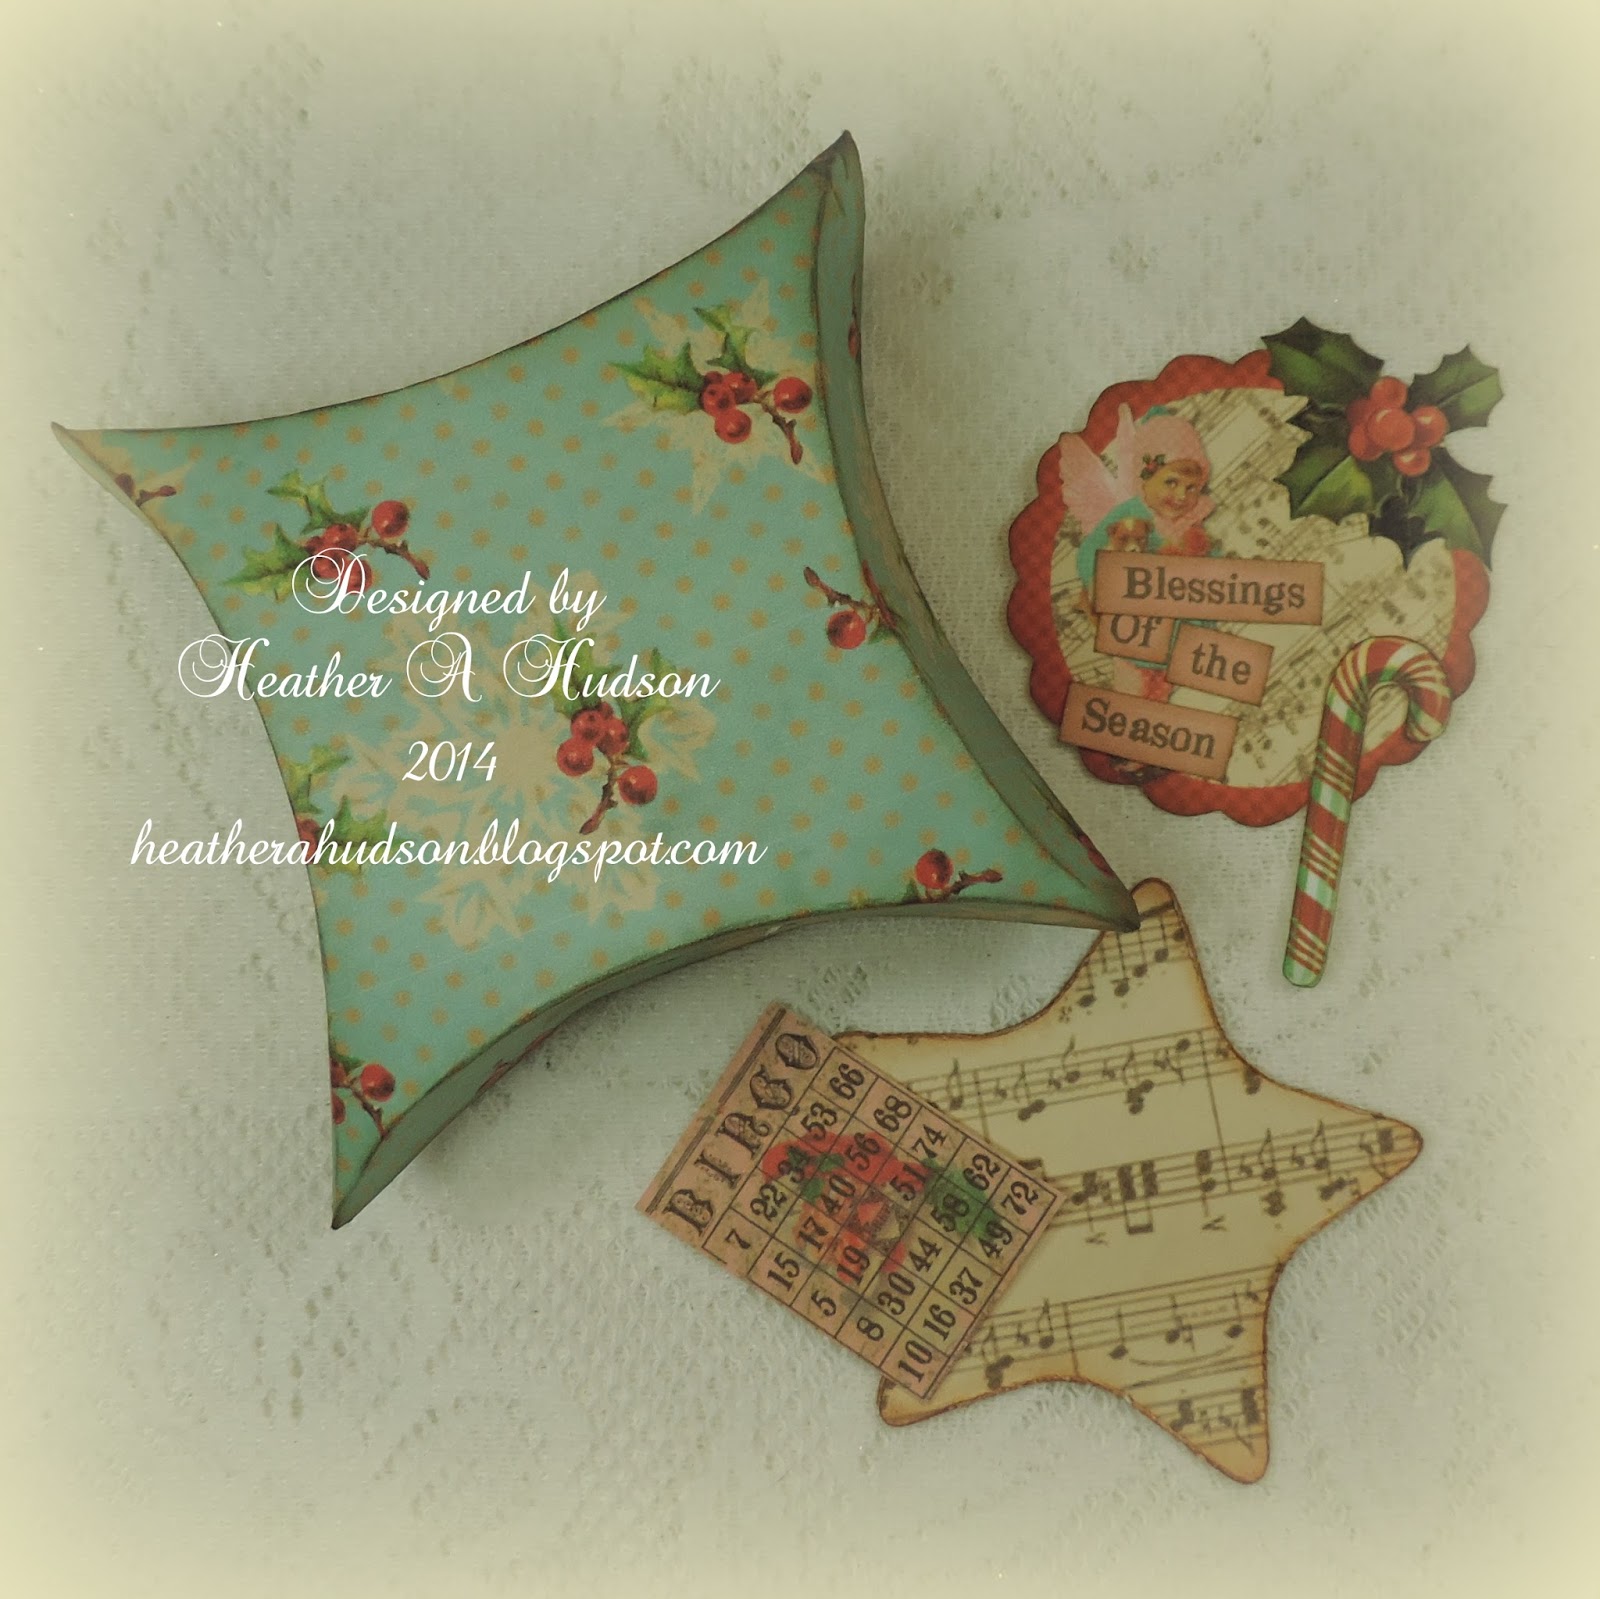
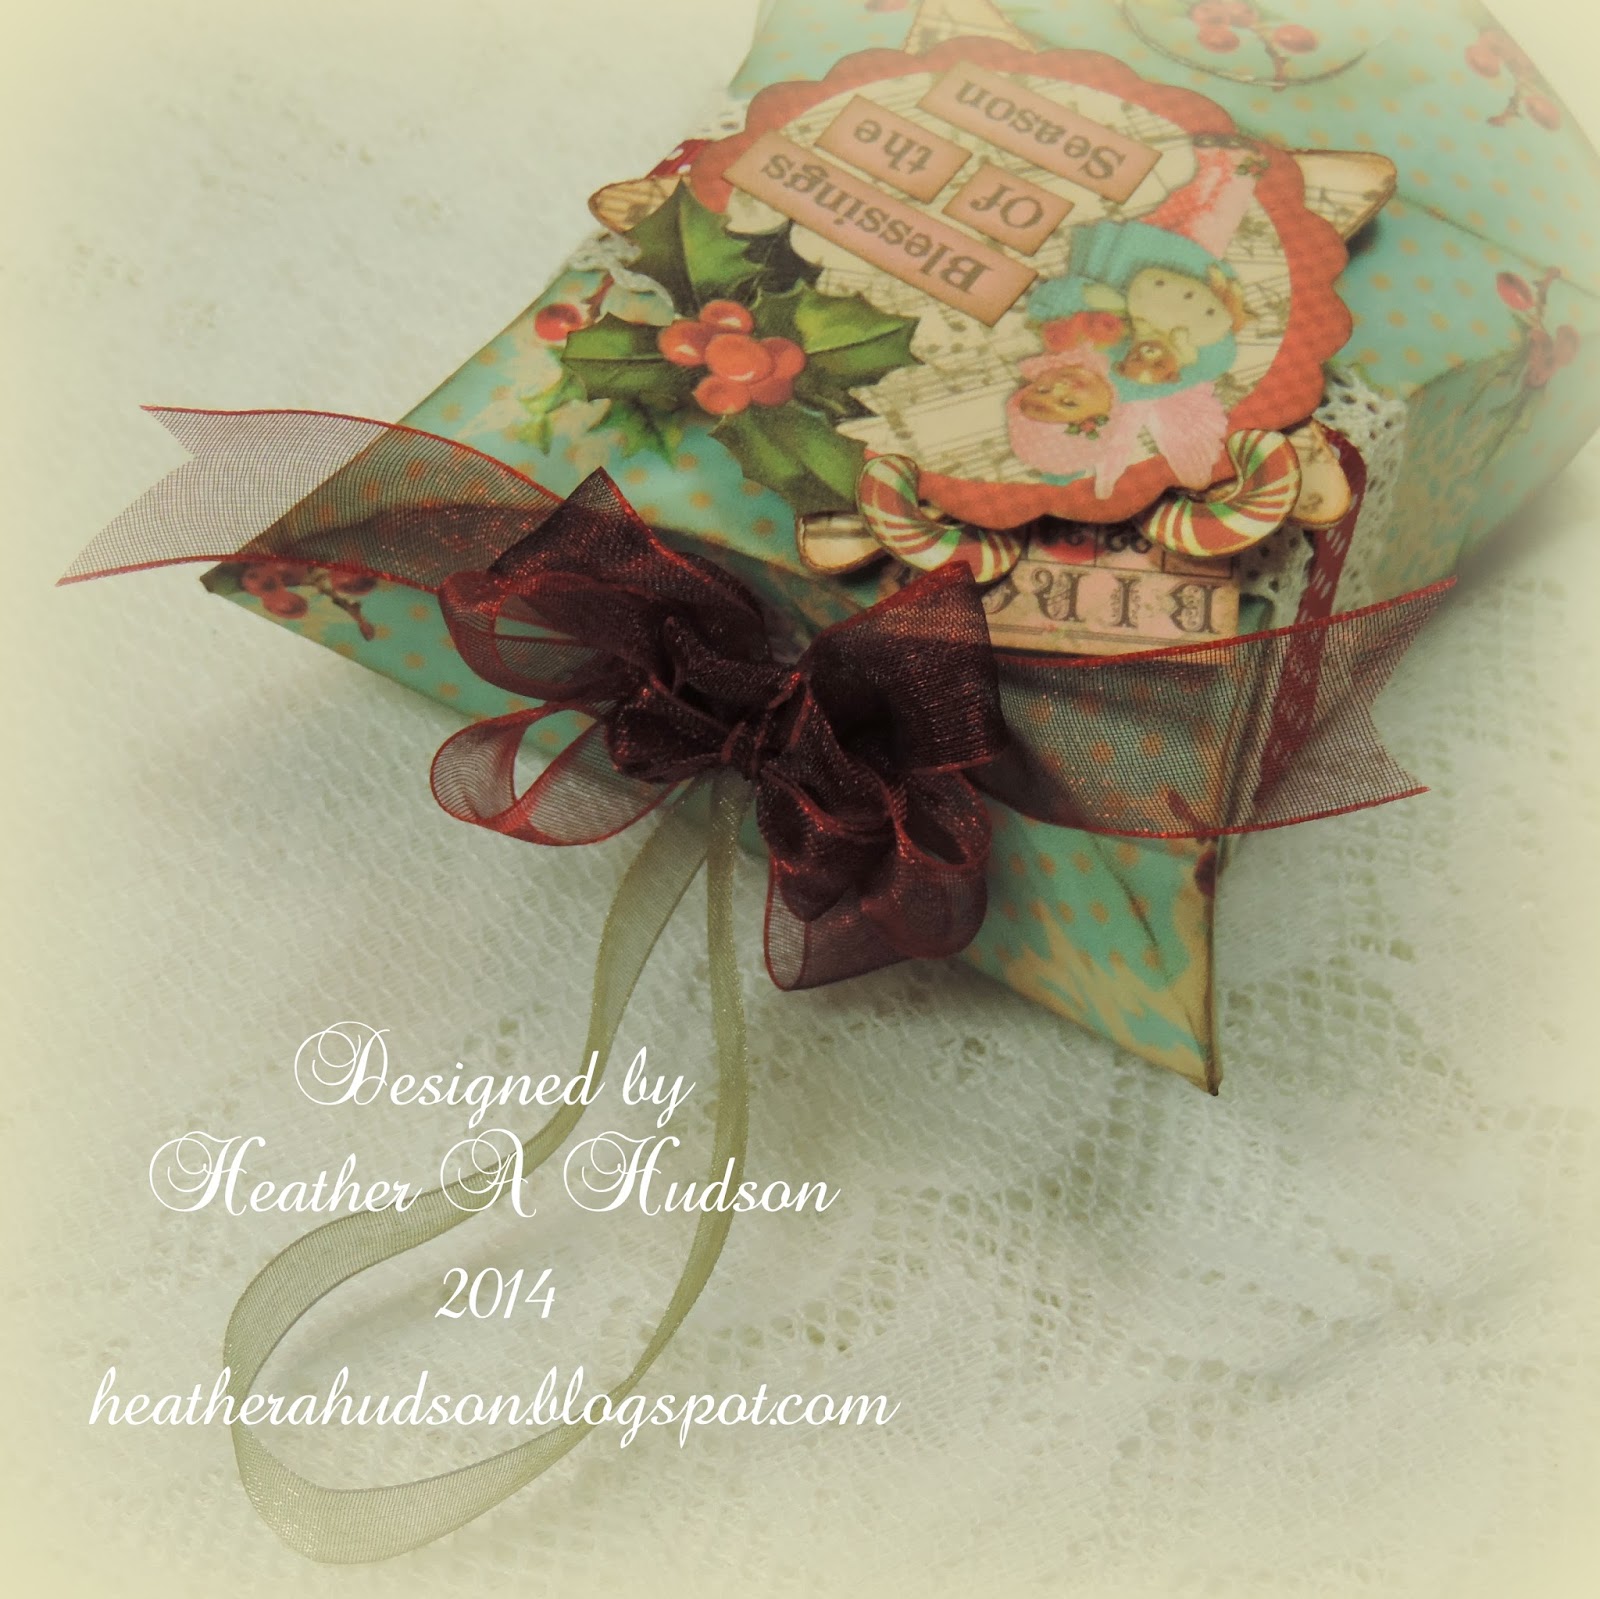
#9  Pillow Box Ornament & Additional Painted Chipboard Pieces
I painted a couple pieces of Chipboard and used one of them on my Christmas Pillow Box.
Here is a close up of the piece. 
You can see all four pieces that I painted below.  After painting, Ranger's Crackle Glossy Accents was applied. 
 Here is a Video Tutorial, showing you how to paint the pieces yourself.

#10 Winter White Warm Delight Snowman Tag

I hand painted  the chipboard "Joy" and snowflakes with cream paint and then shaded them with brown.  Then added some touches of brown glitter.
Closeups
Close up
Close up
Here are a couple of photos of a few pieces of Chipboard that I will be using in projects later this week :0)
Winter Blue Snowflakes
Shabby Chic Blue & Pink
 Christmas Holly Vine
One last piece from an old layout
Thank you visiting my blog today!!
Hugs!!
Heather

Saturday, November 29, 2014

Warm & Cozy Winter White Snowman Delight Tag

Hello Friends!!
I hope that all of you who celebrate Thanksgiving, had a nice one, and that everyone is taking advantage of all the wonderful sales going on right now!!
I just love this time of year!  
So, today I would like to share with you my 
Warm & Cozy Winter White Snowman Delight Tag.

One of my resolutions for the new year...is to get back into using some different techniques on my projects.  Sometimes I get so caught up in the fun of designing new collage sheets, that I don't take the time to play with ones I have already designed (they are sitting in my computer, patiently waiting for me to play with them...I feel so bad).  So....here we go.
Of course I have a wonderful selection of goodies from Really Reasonable Ribbon that I have used on my tag.


Here are some close ups of the hand painted chipboard, lovely lace and flower in the lower right.
 I love the pink star with the painted chipboard snowflake, ribbons and lace!
My favorite Snowflake at the top.
Love all the laces and ribbons!!
Here is a close up of my Snowman.
I am hoping to play along in all of Linda's 12 Tags of Christmas Challenge.  I am starting out with Tag #6
I was inspired by the colors of Linda's tag, the word Joy and snowflakes.  I just love the warm feeling of her tag...and I feel I have the same warm feeling in mine :0)

Just follow the link above to hop on over to Linda's blog and you can get all the deets on how to play along.   She will tell you how you can win a fabby prize from the

Here is a talk through of how I put my tag together and the RRR goodies I used :0)

I am so happy with how it turned out.  My snowman image and others were happy to be used :0)

I will be playing along in the following Challenges
(old collage sheets, vintage images)
Thank you for visiting!!
Hugs
Heather

Tuesday, November 25, 2014

Blogging and Painting tutorial

Hello Friends!!
Today I would like to share with you a blogging and painting tutorial.

Blogging Tutorial
Many times when I am visiting other blogs I will see something like this on their blog (meaning the white highlight behind the text here...lol).  I have done a tutorial on how to fix this.  Whether it is white behind the text or a different color behind your text.
I have done a new tutorial that shows you how to fix this and it is easier and quicker.  So, if your text on your blog looks something like this, or if you do a lot of copy/pasting from another person's blog...the video below could be helpful for you, if not now, then in the future :0)


The other day I posted my new
I had a couple pieces of chipboard that I had painted.
Here is a close up of the chipboard piece on this box.
 I painted a couple pieces at one time. 
You will notice in the photo above that the one piece in the upper right was not covered with Glossy Accents, I wanted you to see the difference.
The video below will show you how I painted the chipboard.

It is kind of long...LOL.  Once I get going....I get going and time just seems to slip away.  So I would suggest you wait till snack, lunch or tea time to view.

Hope you have a fabulous day!!
Hugs
Heather


Monday, November 24, 2014

Guest Designer @ Craft Hoarders Anonymous Pillow Box Ornament Tutorial

Hello Friends!!

Happy to share with you that today I am Guest Designing for
Gloria's Challenge Blog
Craft Hoarders Anonymous!!

Challenge #20 Box it Up!
Your challenge is to create some sort of altered box. You can create a box from scratch, or you can alter a pre-made box. Your box can be made of paper, wood, chipboard, plastic, or metal. As long as you dig into your hoard to decorate a box, you have met the challenge requirements! The box does not have to be used as a box...it can be used as home decor or for any purpose you can imagine. Let's box it up! 

One talented participant will receive this prize donated by
 Heather A. Hudson of My Artistic Adventures
That would be me :0)  LOL

Here is my take on the Challenge.
I decided to do a NEW Pillow Box...woot woot!!
I used some goodies from Really Reasonable Ribbon!
Robin's Egg Blue Snowflakes and Holly Pillow Box Ornament Collage Sheet $6.00
Since we are to use things we are hoarding...I have a pile of Bingo Card and Star images from some of my other sheets that I have not got around to using...so they are included in my piece below...as well as some chipboard pieces that I have been hoarding.  
They are from my Christmas Bingo 2 sheet Set $6 

and 
Peace on Earth Set $5
Before I begin my Tutorial...don't forget
I am having a Give Away.
A chance to win a $50 Gift Certificate 
for Collage sheets 

All you need to do for a chance to win is to

 and the

Subscribe to my Youtube Channel.

When you are finished with all the tasks, please send me an email letting me know what sheets you would like to win..or a general idea.  So I know you played along.
heatherahudson@gmail.com


Tutorial
First I cut out my Pillow box and inked the edges with Ranger's Frayed Burlap.
I cut out some images from another collage sheet and used the same ink to ink them.  I punched a whole in the top where indicated on my pattern.  First I placed one of the pink circle enforcers on the inside of the box to make the handle area more sturdy.  Same with the outside top...added an enforcer.  If you wanted at this time you could add the Old Willow Organza hanger.  Much easier than doing it after you have closed up the sides.
I took the Edna Crochet Lace and wrapped it around my pillowbox, gluing it in place and then doing the same with the Red with white dots grosgrain.  I started the lace in the front, so it ended in the front and would be hidden by my focal piece.
I added Tombow Foam tabs to the back of my star...and made sure to leave enough room to slide my little Christmas Bingo Card and 
candy canes into place.
Now I actually opened up the bottom and tied and doubled a piece of Old Willow Organza and then tied the end into a knot, then threaded the loop through the whole in the top so it would be used as the hanger.
I glued my sentiment into place and have all my goodies tucked in where I would like them to go.
I topped the pillow box off with a Triple Loop Bow that I made out of Red Iridescent organza, using my Bow it All tool from
Really Reasonable Ribbon.
I added lots of glitter from Art Glitter.  I also added a tiny button in the lower right tied with Peppermint Baker's Twine, and used a Deep ivory Mulberry Rose above it.
For the final touch I painted a couple pieces of chipboard,
I added one to the bottom left corner.  
Here are a couple close ups
Detail of the tiny Bingo card and Candycanes.
 Holly, flower, and button detail
Focal Image
The chipboard, which was painted and then covered with 
Crackle Glossy Accents.
If you feel like listening...I talk you through what I used in the video below.

Don't forget if you are using a box as gift packaging
you can enter the


You can link up at Craft Hoarders here!!
Thank you for visiting!!
Hugs
Heather