Monday, May 26, 2014

Craft Hoarders & Creative Cutting Challenges

Hello Peeps!!
I hope you are all having a safe Memorial Day Weekend.
Today I have two projects to share with you.
First up I am excited to share that I am Guest Designing again this month for Gloria's Craft Hoarders and the challenge this time is to show some glass/metal in your project.
Here is what I made for inspiration.
I upcycled a pickle jar.
My Pickle jar started out looking like this.
I added a coat of Old White Annie Sloan Chalk Paint, then clear wax and finished off with dark wax.
I used a digital paper that I designed and used an image from this month's ephemera For the Birds at Gecko Galz.  All my ribbons and trims are from Really Reasonable Ribbon.
I also added a tiny metal shovel and watering can.  I filled my jar with some of the lilacs from my yard.
My second project is a card that I made for our
Father's Day Challenge that is going on at
I used Cindy's Car file which you can get here.
Car Set - Click Image to Close
I can't wait to see what you create and share with us at Craft Hoarders and the Creative Cutting Challenge.!!
Thank you for visiting!!
Hugs
Heather

Thursday, May 22, 2014

How I like to plant my Flower Pots

Hello Peeps!!
Happy Friday!!
Today I thought I would share with you some of the Flower pots/ hanging baskets and Feed Sacks that I have planted.
Last summer I didn't get around to planting much because I was so busy with work and the 5 Design teams I was on.  So this year I have taken the summer off from a lot of my paper crafting so I can play in the dirt :0)
Here is one of two flower pots that I planted on Thursday.
I tend to like Red, White and blue flowers...with Pink :0)  Every year I say I will do something different...but it always ends up being the same colors...lol.
Today I thought I would share with you how I go about potting my flowers.
Here is what I used for the pot above.
Flowers
  • 12 cells of blue lobelia (tiny cell packs or flat)
  • 12 cells of white alyssum (tiny cell packs or flat)
  • 2-bublegum pink Proven Winners petunias (4" individual pot)
  • 4-red wave petunia (6 per pink container pack)
  • 1-pink new guinea impatiens (half gallon container)
  • 2-white Proven Winner's superbells (4" individual pot)

I like to start out with a pretty pot that doesn't weigh very much.  Otherwise you will need to plant your container where you will be placing it.  They can get heavy.  One trick that I use to keep the weight low..and the amount of top soil down...I will crush up some of the plastic flower cell packs and fill the bottom of larger containers with them...then put in my potting soil.   I fill my up my pots to about 3-4 inches from the top rim.  Seems just the right height for the flowers to sit in.  You can just use one of your flowers as a guide.
  I take all of my flowers out of their containers and break up the roots a bit...kind of root bound in the containers.
I put my New Guinea Impatiens in the center of my pot.
Next I placed my two Bublegum Pink Petunia's in the pot.  One at 3:00 and the other at 9:00 (I am using a clock as a reference here).
Here is a side shot photo.  So you can see what things look like from the dirty point of view...lol.
Next I added my Red Wave Petunias.  They are placed at 2, 4, 8 and 10:00.
Next are the White Superbells.  I placed them at 12 and 6:00.
Next we will tuck in some Blue Lobelia and White Alyssum.
To keep it simple, I am planting 2 cells of the Blue Lobelia between the Pink Petunias and Rim of the container. 
Here is how that looks.
 I am planting 3 cells of White Alyssum in front of each of the Red Petunias.
Here is how that looks.
Now if you look at the photo above, you will see we need to add some of the Blue Lobelia (to break up the White Alyssum and White Superbells)  So I am also planting 2 cells of the Blue Lobelia on either side of the White Superbells, toward the rim of the container.  So it is mainly filling in any open space toward the rim of your container :0).  I tend to add a lot of flowers to my pots ect...so feel free to not do so many, they will fill in as they grow...I tend to like mine over spilling with blooms later in the summer.
I just LOVE flowers!!
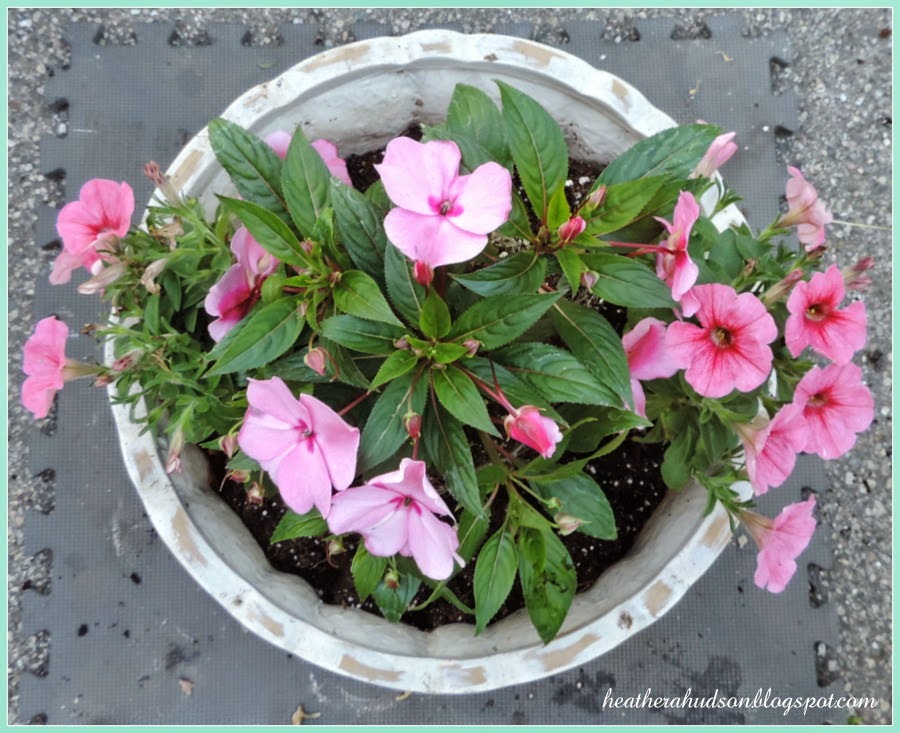
Here is a look from above.
I did two the same way and placed them on two of my outdoor tables that I gave a fresh coat of paint too.  You will notice that I didn't add any vincavines to my containers here...because the last time I did they grew through the wholes of the table and made it difficult to move the pots when needed...lol.
Here is the other one.  Sorry I grass is not the best...lol.  Our yard is really woodsie...and difficult to keep the grass going in all areas.  I have been after the hubby for a sprinkler system for 7 years...lol.  Maybe more!!  I did just get that new truck...so....maybe next year :0)
Tomorrow I will share with you my Hay Sacks and a couple other pots I planted.
Thank you for visiting!!
Hugs
Heather


Tuesday, May 20, 2014

My New Truck :0)

Hello Friends!!
Happy Tuesday!!
I will have to admit it feels really weird not creating projects all the time to do blog posts....It has been a whole week and a day since I posted last....oh my!!
I have been busy, cleaning out my garage and working on my flower beds, which both were a BIG mess.  So you can fully understand, I want you to think of anyone you know who is a creative person...but is a big mess....then multiply that mess by say...5 or 6...then you have me :0).
Good news...I have taken the summer off of some of my crafting to do some much needed cleaning and finishing things around the house.  I have made GREAT progress on my garage!!  My mom says she still won't believe it till she sees it...lol.
So...the reason I have been cleaning out the garage is because I bought myself a NEW TRUCK!!  Wooo Hooo!!
It took 3 weeks and it came in last night!
Here is is...It is sooo Pretty...(and useful..lol).
I will have to say...I LOVE it!!
I love the white with the chrome accents...and the of course the twin tailpipes....sweet :0)
Last night the family went to the Olive Garden to celebrate.  We had a blast and my oldest was happy because there was plenty of head and leg room for him.  My Youngest had to goof around and get in the back right off the bat...and of course do some push ups....lol.  They are kind of weird like that...nothing like walking out of the Olive Garden (of course I parked far out so I would have an easy time pulling through the spot...lol)....and seeing both of your sons doing push ups in the parking lot next to your truck.  Craziness....especially when they go into can you do this mom?  LOL.  Um...no thank you :0)  So after they each did their 20+ pushups they got in the truck (thank goodness no one was around...lol).
Here is a look at the front.
When we went to pick up my truck I was happy to see there was a spot on the front for a vanity plate :0)  I am a super Americana Gal!!  This vanity plate was on my Pacifica, my youngest took it off and washed it up for me..and then placed it on my truck :0).  One of my best Painting Friends Marybeth, her hubby Mike gave me this a LONG LONG time ago.  I am thinking of painting myself a new one...similar...but with some roses of course :0)...lol.
My hubby had a Chrysler 300M that we gave to our friends Debbie and Rex.  Debbie and I did a TON of PTO stuff and Teacher Helper stuff together through out our kiddos being in elementary school.  We had some GREAT times.  Of course she was there a little longer than me because she had a pile of kids...lol.  I will tell you that if you need anything for a school DEBBIE will get it...and at a price that will make you go...
GET OUT...REALLY???
Here she is with my Pacifica :0)
Her hubby Rex...is a mechanic genius!!  Always able to help  me out when I needed it.  Did I mention when they took the 300M it had a little over 200,000 miles on it.  It now has.....312,000!! No major repairs have had to be made!!  How cool is that??  Nothing makes you feel better than knowing that someone else is going to take your vehicle and keep it going!  Here he is below....straight from work :0)
You won't meet a nicer more giving couple!  So I am so excited to see howmany more gazillion miles they will get out of it!! The great thing about the pacifica was I got a great deal on it...and it has all kinds of bells and whistles.  Their whole family will be able to fit in the pacifica..and they kiddos will enjoy the DVD player.  So yesterday was an exciting day for all of us!
I will have to tell you I am very lucky in that I have some great friends!!
One of the best things about my new truck...is it comes with it's own 
DON'T BACK INTO KENNY'S CAR DETERRENT SYSTEM
(LOL)
See..here I am backing out of the garage.
Hmmm...I am thinking what is that back there???
Oh...it is Kenny's car :0)  All safe and sound!!   I noticed when I went to take the kiddos to the bus stop this morning that he had parked even farther away than normal....lol.
I hope you are having a fabby day!!  I have loaded up the back of my truck with a ton of swimming noodles, super soakers, craft goodies, water rafts, and life jackets that I am donating to the local summer camp that my kiddos went to a few years ago.  They have a great lake area...and my kiddos are not interested in them anymore.  I also have a couple of boxes of goodies to take to the salvation army.  Already getting great use out of the truck!
BTW...I will let you know how the gas mileage is soon.  It is supposed to be better than past models.  There is a little eco friendly setting so you can see when you are driving efficiently...super cool.

Thanks for visiting!!
Hugs!!


Monday, May 12, 2014

Guest Designing for Craft Hoarders and Creative Cutting Challenge


Hello Friends!!
I hope you are having a fabby day!
Today I have two things I would like to share with you!!
First up I am super excited to be Guest Designing for Gloria's Craft Hoarder's Challenge!!
The Challenge is Ribbon, Lace and Twine and the Sponsor is 
Really Reasonable Ribbon!
(you need to use ribbon on your project).
I would also like to share with you what I have made for the 
Graduation Challenge that we have going on at 
the Creative Cutting Challenge.
All you have to do is use an SVG file and create something with a graduation theme.  Of course I have used Ribbon, some twine and lace and will be linking it up to Gloria's Challenge :0).  I used the Graduation Cap svg (and created a shadow layer), cut off the tassel and added one made of cotton candy baker's twine.  I have Juliet lace across the bottom of my card as well as some buttons also tied with the same baker's twine.  I used my Bow it all tool to create a lovely bow out of pink salmon seam binding.  Topped that with a sweet Pink wild Rose.
I used Cindy's Graduation File You can get it for $2.00.  
 Here is a look at the set below.
Graduation--Set Two - Click Image to Close
Here is a close up of the upper left.
You can see where I used the Jennifer lace, bay leaf seam binding and metal gray swiss dots ribbons tucked under my focal pieces.
Back to the Ribbon Challenge at Craft Hoarders.
I created my album using large shipping tags.  Then created pockets and tiny tags out of a couple different digital papers that I designed.
I used a lot of lovely ribbons from Really Reasonable Ribbon.
I plan on filling up the book with photos and giving it to my In Laws for their 50th Wedding Anniversary.   
I added a couple photos to some of the tags...I am waiting for other family members to send some photos.  Then I will add more ribbons and flowers :0)
Here is a close up of the binding ribbons.
I used the same metal grey swiss dots, salmon, bay leaf seam bindings as above.  I also used the Havana brown seam binding, pink diagonal, and old willow organza to decorate my binding.
Here is a close up of the Ties and tiny tag.  I used some of the baby pink and deep ivory mulberry roses through out my album.
Here is a close up of the cover.
The tiny text boxes are from a collage sheet I designed.  You can find it and other color text boxes here.   I used the Edna Lace, as well as salmon pink seam binding, moss green leaves and some beads to hold my tags in place on the cover.   I also used my Perfect layer's rulers to create all of my mats for both my card and my album.  You can receive a 5% discount if you use my promo code Heather5%.
I can't wait to see what you create and link up to our 
and the
Thank you for visiting!!
Hugs
Heather

Tuesday, May 06, 2014

Challenges at Gecko Galzz

Hello Friends!!
Today I would like to share with you what I created for the
The focal image of the bird on the front of my card is from Vintage by me, and the tiny butterfly image and all paper layers are from Gecko Galz.
The papers and images on the hidden tag are from this month's ephemera at Gecko Galz!!
My Ribbons, flowers and buttons are from 

This month at Gecko Galz our Customer Challenge is 
You can link up your Mother's Day Creations at the link above and the only rule is that you must use at least one 

We also have a few challenges going on in our new 
It is set up as a private group, so just ask to join and we will add you to the group.

We have a Mother's Day Challenge
Post Card Challenge
Cinco de Mayo
National Scrapbook day Challenge
and
Mother Goose Challenge

You can get all the details and info in the facebook group!!
I can't wait to see what you create!!

Thank you for visiting!!
Hugs
Heather

Thursday, May 01, 2014

Gecko Galz & Really Reasonable Ribbon Challenges

Hello Friends!!
Yay....it is May!!
So...I have TWO new challenges to share with you for May.
the 
and 
Here is my Inspiration piece for both challenges.
I just LOVE it!!
I am kind of excited because I am officially the
Design Team Lead for Gecko Galz
(kind of have been...but now I got a title and Blog permissions)
Sooo...check out the Gecko Galz blog...I changed it up a bit.
I used some Fabulous Ribbons, Trims, Buttons and Roses from Really Reasonable Ribbon...and Fabulous Images from Gecko Galz!!
I also used my Perfect Layer Rulers to create all my mats and layers of paper!!  
I used the Floral Symphony digital paper pack and For the Birds Ephemera and Nature's bliss jewel it set for my piece. I embellished it with the deep ivory & baby pink mulberry roses.  I layered the Edna lace, Light blue checkerboard satin and Blue Rose grosgrain ribbons across the center of my piece...and across the bottom, I just used Juliet lace instead of the Edna.  Of course I used my Bow it all tool to create that fabby Pink Salmon Seam binding bow!!  I used the Tombow tabs to elevate some of my layers.
I have some Natural Crochet lace on my sweet little Gecko Galz  Butterfly Jewel it image...and across the top of my tag.  I topped off my tag with some buttons and a simple bow made out of Light blue checkerboard satin.  I tied the sweet little bow in my jewel it image with teal baker's twine.  I used one of my Tiny Text Digital Collage sheets for the word "Mother."
Here is a close up of the hidden tag :0)

I can't wait to see what you create!!
Hugs
Heather