Hello Friends!!
I am so excited to be participating in the
Hopefully you are visiting me from Cherry's Blog.
If you are just joining the blog hop, then you will want to start at the
Really Reasonable Ribbon Blog.
That way you can see what you can win, and not miss out on any of the Design Team's fabulous creations using this month's
That way you can see what you can win, and not miss out on any of the Design Team's fabulous creations using this month's
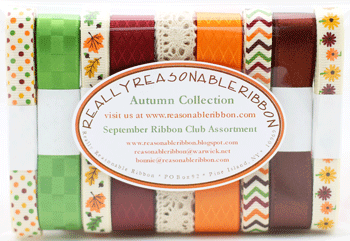
Autumn is one of my FAVORITE times of the year...and nothing says "Fall or Autumn" better than Bonnie's beautiful assortment!!
When I saw this month's assortment, I was inspired to Design a Couple of Autumn Digital Collage sheets!!
I love the Banner Piece I created with my collage sheet and Bonnie's Ribbons!! It measures a little over 7 inches wide by about 9 1/2 inches long.


I used GIMP to create the "Vintage Autumn Banner." I found the music background and Little girl (which I altered quite a bit) images at the Graphics Fairy. You can find the collage sheet in my Etsy.
****If you would like a chance to win my collage sheet, then just leave a comment below. I will do a random draw from the comments, and announce the winner on Friday Sept. 20th on my blog.****

Here are some close ups of the Banner with this month's fabulous Ribbon Assortment as well as some other fabby RRR goodies! So many goodies here...I am not sure where to start...lol.
The gorgeous ties at the top were created with the Olive Wrinkled Ribbon. Below the ties you will see where I used the Autumn Confetti Dots, Flowers and Leaves Grosgrains and the Diamond Tangerine Satin and Cappuccino Ribbon from this month's Autumn Assortment. I also used the new Chloe lace and tied bows with the Diamond Sherry ribbon from the kit.
 I also tucked in the Micro orange gingham ribbon, it too was inked with Walnut stain Distress ink by Ranger. Juliet lace was tucked in between the little brown and Green banner pieces. I cut part of the Brown Crochet lace away, to give the edge a scalloped look, and placed it across my brown banner piece. Topped it with a darling little button from the Vintage Button Bonanza, tied with Brown Sugar Baker's Twine.
 I did use the Art Glitter Designer dries clear Glue and the Ultra fine Metal Tip to add polka dots of glue around my banner pieces. Below you can see where I added the dots and then added the #301 Amazon glitter to the green layer and #56 Pumpkin to the orange layer. I used a brush to apply more glue to my cardboard base egdge and applied the #9 Brown Gala Glitz. Autumn Confetti Dots, Flowers and Leaves Grosgrains were used again as well as another button from the Vintage Button Bonanza, tied with Brown Sugar Baker's Twine.
 Here is a close up of the focal image I designed. I just love this little girl image I found at the Graphic Fairy. I have her in School Clothes, Halloween Dress...and the Autumn Dress below. Again, I used GIMP to create my collage sheet. I used the Dream Weaver: LJ 849 Bare Trees Stencil with Vintage Brown Photo distress ink to add a little variation to my brown music layer. I also used more Pumpkin and Amazon glitters as well as #324 Country Red and #226 Lily of the Valley on the little girl's dress.


One last look at the whole piece.
 I just love working with this month's ribbon assortment!!
I hope that you have been inspired to create some fabulous projects and do a little shopping and maybe get yourself some fabulous finds from Really Reasonable Ribbon.
**Next stop on the Hop**
Time to hop on over to Tammy's blog, see what she has created, and leave her a little love.
I will be sharing my post with
Brag Monday at the Graphics Fairy
and
Make it Monday
I will be playing along in these challenges
Aud Sentiments: Autumn (not Halloween)
Frilly & Funky Anything Goes
DreamWeaver: Autumn
Thank you for visiting!
Hugs!!
Heather
When I saw this month's assortment, I was inspired to Design a Couple of Autumn Digital Collage sheets!!
I love the Banner Piece I created with my collage sheet and Bonnie's Ribbons!! It measures a little over 7 inches wide by about 9 1/2 inches long.
I used GIMP to create the "Vintage Autumn Banner." I found the music background and Little girl (which I altered quite a bit) images at the Graphics Fairy. You can find the collage sheet in my Etsy.
****If you would like a chance to win my collage sheet, then just leave a comment below. I will do a random draw from the comments, and announce the winner on Friday Sept. 20th on my blog.****
The gorgeous ties at the top were created with the Olive Wrinkled Ribbon. Below the ties you will see where I used the Autumn Confetti Dots, Flowers and Leaves Grosgrains and the Diamond Tangerine Satin and Cappuccino Ribbon from this month's Autumn Assortment. I also used the new Chloe lace and tied bows with the Diamond Sherry ribbon from the kit.
My focal image, text boxes and orange layer were all elevated using the Really Reasonable Ribbon Foam Tabs. I used the Scor Tape to adhere my Orange and green layers together, and to attach my tucked in ribbons at the top of the banner piece.
I used a piece of corrugated cardboard, which I painted Dark Orange and Shaded with Cinnamon. I used my Perfect Layers Ruler to create a 1/2 inch border out of the cardboard. It was soooo easy!! I used my Orange banner piece, placed a small amount of glue using a glue stick to the center of it then placed it on my cardboard. Then I used the 1/2 inch perfect layer ruler, and was able to draw lines and cut out the piece. I finished decorating my layers, then added them to the cardboard piece last.
One last look at the whole piece.
I hope that you have been inspired to create some fabulous projects and do a little shopping and maybe get yourself some fabulous finds from Really Reasonable Ribbon.
**Next stop on the Hop**
Time to hop on over to Tammy's blog, see what she has created, and leave her a little love.
I will be sharing my post with
Brag Monday at the Graphics Fairy
and
Make it Monday
I will be playing along in these challenges
Aud Sentiments: Autumn (not Halloween)
Frilly & Funky Anything Goes
DreamWeaver: Autumn
Thank you for visiting!
Hugs!!
Heather