
Over at Swirlydoos Angelica has a "Butterfly Challenge." I honestly have never been into butterflies (although I do have some butterfly Christmas ornies...lol). I made some butterflies on one of my layouts, and thought it would be fun to create my own stamp!
I have carved my own stamps in the past and thought I would share my process with you.
You will need: a pencil, black fine tip marker, tracing paper, drawing, Speedball: "Speedy Carve" ( I get mine at Michaels) and a carving tool with blades (Got mine off ebay). It is messy...so wear something not too nice...lol.

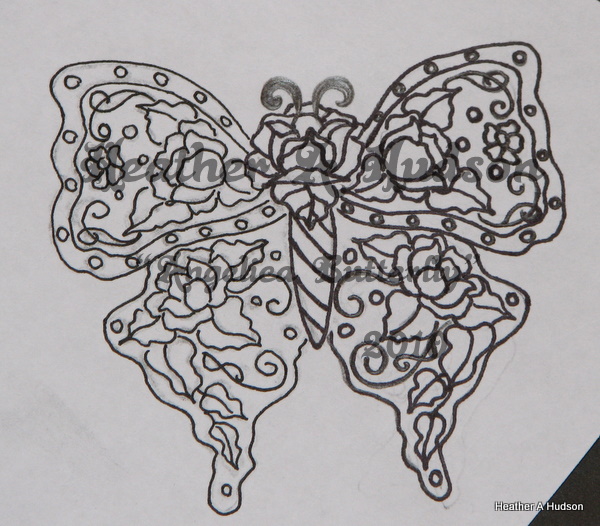
I started out with a sketch of half a butterfly. I only did half, because I wanted both sides to match. I traced over my pencil drawing with a pen...but that was only so you could see it better in the photos. You will just need a pencil..you don't really need the pen. I traced over my drawing with a pencil onto tracing paper. When I was done, I flipped over the piece of tracing paper and scribbled pencil on it. Normally I would use a piece of transfer (black graphite paper), but I didn't feel like looking for it...and the pencil works just as well...just a little messy.

Here you can see how I lined up my butterfly half that I traced.

You can see here how the image transferred onto the paper. I transfered mine onto the original drawing...(I went over it with pen so that you could see it in the photos).
So now you cut out around your butterfly leaving your self about 1/4 inch or more away from your drawing.

So it should look a little like this. Now you just flip over your paper...and place it where you want it on your "pink stuff." I put mine close to the top, because it will be cut out anyways...and why waste all your KEWL pink stuff!

Now you are going to do like we did before .....where you just rub your pencil or another object on the paper...to transfer this image onto your pink stuff.

This is what you should get. Just a tip...the pencil marks (on the pink stuff) does smear if you rest your hands on it. So either do a simple design the first time...or use that fine tip marker to go over your design. That way if you don't have time to carve it all at once, you will still have your markings when you get back to it.

I use the #1 carving tip...I think it is the smallest size...it is the smallest I have anyways. The nurse in me says..."never carve toward your other hand...you could cut yourself"...so this is one of those photos that depicts the old ..."do as I say...and not as I do"..until you feel really comfy with your tool.


I have found that just like with painting...it is easier to turn the piece you are working on...than it is to turn your hand. The pink stuff is really easy to carve into. I normally do a light carve ...and then go back over it a second time. There really is not much resistance when carving..this stuff is great (my hands tend to hurt alot...and this does not bother them).

The whole time you are carving you will have these tiny pieces of pink stuff laying around. You will notice then up by my left hand. This can get messy...you might want to do it on a table..so it is easier to clean up.

I went on an inked this...so what I carved would show up better. This also lets you see where you may need to carve a little deeper. I switched my blade to the cutting blade (kind of like an exacto knife blade but curved). This was a nice handle set, with
changeable blades. The starter kit at Michaels comes with just a wood handle and a bigger blade...so you may have to look it up online ( I will do that later and add the info). I was super lucky and picked my set up at a YARD SALE two years ago. Finally used it a couple of months ago. Michaels just recently started to carry just the pieces of "Speedy Carve." So go online...sign up to get their emails...and you will probably get a coupon for 40% off one item. Otherwise...if you are not using your JoAnn coupon...usually Michaels will honor it (ours does anyways).

As you can see on the right side of the butterfly, I have started to cut out the shape. I use the cutting blade for this. I just cut off the pieces in tiny chunks. I try to cut on the line that I carved. Sometimes I take the blade and make cut toward the line (that you previously carved)...and then follow the line...and remove that chunk.

You will have a pile of pieces kind of like this.

Once it is all cut out...I ink it...and flip it over to stamp...as shown above. This inking ...and stamping will let you know if you need to cut a little more of your edges off....you will see them in your stamped image. You can see here how the back of your stamp can get messy.

I used a tiny Colorbox Cat eyes...so you can see a few of the lines...from the shape of the ink pad (I was too lazy to go out to my car and get my bigger ink pads...lol).
I just clean my stamps with water...and a little soap. I just pat...so as not to ruin the "Pink Stuff." They will stain...my stamps are all kinds of colors...and they still work just fine!
I will post some photos of my other stamps I have carved tomorrow.
Later in the week...I think I will get my new Teresa Collins stamp maker out...and make a stamp of this image. It should be really cool, because I can do the reverse...so the butterfly can be colored in! Check back next week...if not sooner!
Thanks for hanging in there...on a long post!
Hope this inspires you to try making your own stamp!
Hugs
I love how you incorporated your roses into the butterfly wings! Very unique...oops I meant "Heatherly"!
ReplyDelete