Sunday, April 13, 2014

. Mother's Day Card Collage Sheet

Hello Friends!!
It is getting close to Mother's Day and this year, just like the last two years, I thought I would create a free Digital Collage sheet for you to create with.
Today I am sharing with you one of my cards.  This one is my
under 10 minutes Mother's Day Card.
I wanted to keep my card simple and quick, so that those of you who are like me and leave your crafting to the last minute, will be able to throw this together quick!
Of course I used an image that I found from Karen at the Graphics Fairy.  She is so generous sharing all of her images!!
You can find my free collage sheet and tutorial for this card here.
You can see my collage sheets that I have made using some of her images in my Etsy shop here.
You will want to stop back by my blog on the 18th, to see a tiny canvas that I have created from the same collage sheet (with tutorial) as well as another card using the same images above, with more embellishements and a hidden tag.
Thank you for Visiting!
Hugs!!
Heahter


Really Reasonable Ribbon Blog Hop and Gecko Galz Vintage Vamps!!


Hello Friends!!
I am so excited to be participating in the
Hopefully you are visiting me from Jessie's Blog. 
If you are just joining the blog hop, then you will want to start at the 
Really Reasonable Ribbon Blog.
That way you can see what you can win, and not miss out on any of the Design Team's fabulous creations using this month's
Really Reasonable Ribbon Assortment!!
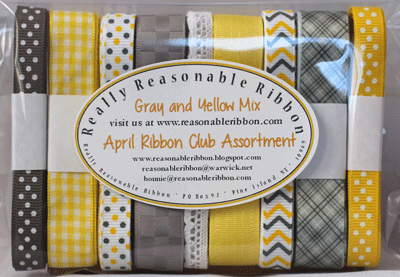
Here is a photo of the Ribbon Assortment below!! 
Monthly Ribbon Club, Domestic
This month we have beautiful Beautiful Yellows and Greys... 

Yummy!!

I stopped by to visit my BFF Ginny last week and I mentioned how I needed to work on my blog hop project...while we were visiting the local coffee shop.  We both had some coffee..when I mentioned ..hey have you seen how peeps make little albums out of these??  Referring to the coffee cup sleeves ...which both of us decided then that my blog hop project would include them..and we both grabbed one for our cup..and we were on our way... over to Ginny's Store...where I 
 sat down at the table and "Poof" like magic...a box of scrap papers and a little bee trinket ended up in front of me.  
So thanks to her scraps...and The Vintage Vamps images from 
Gecko Galz...I have a great start on my coffee sleeve mini!
Here is a look at how it is coming along!

I used Metal Gray Swiss dots,  Plaid Yellow, Yellow &Gray Confetti dots,  Checkerboard satin Metal Gray, Delicate stitched yellowSatin crosshatch light silver, and Daffodil Swiss dots from this month's kit on my tags and cover!!
I am going to keep my tags flat...so they actually fit in the coffee sleeve pockets...lol.  Above you will see how I tied a bow with my Brown Sugar Baker's Twine through a button...Did you know...Bonnie has lots of fabby buttons!!
I tucked in a piece of Juliet Lace and a 10mm Deep Ivory Mulberry rose.  I used the  Checkerboard satin Metal Gray for the top of this tag.
Here is a look at one of the Yummy Gecko Galz Vintage Vamp Images!!
I have the Daffodil Swiss dots behind this beauty!
The Tag below I used the Delicate stitched yellow behind my image and at the top of my tag :0)  I inked them with scattered straw distress ink.  
Here are a couple close ups of the cover
I used my favorite Juliet Lace tucked in behind my image and raised the image with some Really Reasonable Ribbon Tombow Fix it foam tabs.  Then I wrapped my favorite Havana Brown Seam Binding, and a layer of the Metal Gray Swiss dots around my focal image..and topped them with a matching bow that I made with my bow it all tool.  I just LOVE it!!
I adore the tiny tags that I made to hang off the rings...so sweet!!  My tags say...."Let me bee"...and I have used a Tombow Fix it foam tab to elevate my bee charm over the metal gray swiss dots ribbon!  I tied the charm with a sweet little Lemon yellow baker's twine bow too.  I attached the tags to my rings with a bow made of Oyster Baker's Twine.
You can also see in the photo above the lovely ribbons from this month's RRR assortment that I used on the rings...Love the color combo!!  The second tag says..."your Queen"....so it is "Let me bee your Queen"....lol.  I will be giving this sweet little album to the hubby :0) With some nice little memories on the backs of the tags :0)
On this tag, I used the Satin crosshatch light silver and Lemon yellow baker's twine.  I inked all my pieces with Ranger's Frayed burlap..in case I forgot to mention it.  The sleeve was inked with Vintage Photo.
I used a 15mm and two 10mm Deep Ivory Mulberry Roses with another button from one of my many Really Reasonable Ribbon sets...with a Brown Sugar Baker's Twine bow.  I just love the image!!
 I also added some Glitter to my project.  I used my Art Glitter Designer dries clear Glue & Ultra fine Metal Tip  to add the dots and then I applied Storm Glitter...one of my Favorites!!
Here is a close up of the ribbons on the rings. 
 Really Reasonable Ribbon  has the best Ribbons, trims, buttons foam tabs...and flowers!!  I just love them all!!   Bonnie has the best customer service ever!!  I only say this...because you don't get quick turn around service from too many places :0)...just saying...
One last look at the front all together
Once I get another couple sleeves...I will add some more photos..and share them with you!  Thank goodness I still have some ribbon left!!

I hope that you have been inspired to create some fabulous projects and do a little shopping and maybe get yourself some fabulous finds from Really Reasonable Ribbon.
**Next stop on the Hop**
Time to hop on over to 
Cherry's Blog see what she has created, and leave her a little love.

Thank you for visiting!
Hugs!!
Heather

Thursday, April 03, 2014

My First Artistic Adventure with Annie Sloan Chalk Paint

Hello Friends!!
I am not sure if I mentioned it lately or not...I know I have somewhere...but not sure if I did in a blog post :0)
But...my Dear Sweet Mother has really been wanting me to get BACK into painting.
I have heard many of times....I love your Papercrafting...but you don't DO anything with it.  Which is true, I create all my lovely cards and altered tags...and they go in a box...and end up getting smooshed...lol.
My bff of course tries to motivate me to put them in my etsy shop....omg...that takes time...and then I would have to go to the post office....lol.
So I have decided to compromise.  I have been currently taking over the dining room (which just looks pretty and is never used anyways...lol)...with my paper crafting and I thought.....hmmmmm I really need to put some of my junk away.  
I went shopping in my attic (you would be amazed at what you can find in my house...lol), found this sweet little dresser that I had spray painted black for my boys when they were younger.  It has been sitting around doing NOTHING.  So....I thought...the three draws have three little compartments....that could hold my stuff!
Not a lot of my stuff....but a start...lol
Now of course in true "Heather" form, I had to go shopping to get some paint, and I found all kinds of beautiful things on pinterest that had been painted with Annie Sloan's Chalk Paint.
So I Googled it, and found this sweet little store 45min from my house.
I was in her shop for around 30 min.  Normally I would have stayed longer, but it was getting close to rush hour...and my 45 min ride home would soon be a 2 hour ride home....and I had to pick up the kiddos from Tennis and Track.
Here is what I purchased.
I couldn't decide which blue/turquoise color I wanted...so I purchased both Duck Egg and Provence.  I also purchased Cream and Old White as well as both the Dark and Clear wax.  Brushes and soap too :0)
You know I would of bought more....but then there is this story....for another day.  In short, I thought I would do some surgery on one of my friends cars...sweet right??
Felt sooo bad...I just gave him $1000 to get it fixed...didn't want him to have to report it to his insurance or anything...and I may even get some Cha Ching back!!  So my fun money account took a little hit....lol...kind of like his car :0)
(in my defense there was a lot going on that morning and it was dark).
So back to the painting.  
I also found this chair and tole tray that I had painted orange 
(I was going to paint a witch etc for Halloween on it....).

The Chair
The Tray
Now just so you know...my garage is a mess...and it is RAINING outside..and chilly...but I just had to start painting.
So here is one coat of Provence on everything.
One coat took 11 min on my little dresser.
One coat on the chair took 15 min.
Here is the back.
I decided to paint the tray, put a second coat on the chair and dresser...14 minutes....Once the tray dries...I will add another coat.  Things are drying a bit slow due to the weather!!

So what to do...what to do.....lol
I will fall back into the typical Heather and just throw on my quick and dirty roses...with some leaves....Mr. Snuggles was really into painting today :0)
Okay...now some quick buds...
hmmm...now some quick...shading on the little rose buds and roses.
Now add some green to the rosebuds
Shade on the rose buds and little leaves
Line work
At this point I sent photos to my mom...who proceeded to tell me....I needed to take more time and paint better roses...lol...she is not into my quick and dirty roses and leaves....lol..but sometimes I just want something done :0)...I went ahead and added some wax...so that if I goofed...I could wipe things down and redo the roses...lol.  But...now I have to wait for that to dry...and now I remember why I stopped painting....no patience....NONE!!
So...I went ahead and finished the sides and top with some antiquing...lol.  I guess I will give you a little peek of what that looks like....but you will have to wait till my next post to see it finished :0)  So...I can get some better photos!!  Too dark!
Of course...I have 8 of every kind of glass knob...but not 9...lol...I never thought about needing 9...so I will have to visit my local antique shop and hope the gal has some more of the same knobs...
I sure did have fun...and I didn't even make that much of a mess...even though I am doing this in my family room :0)
Until next time....
Thank you for visiting!!
Hugs!!
Heather