
This month at Swirlydoos they are having a Dusty Attics Chippy contest. If you click on the Swirlydoos link, you can read all about it.
All you have to do is enter a layout with a piece of chipboard that you have "dressed up." I unfortunately don't have much Dusty Attic...so I am all over this Contest...lol. I chose a "Vintage look" because that is my favorite! So I will be linking this up to the Truly Scrumptious #55 Challenge.
Here is my layout using my Swirlydoos April Kit.
 I started out with a 12 by 12 inch piece of chipboard and cut a decorative edge for it.
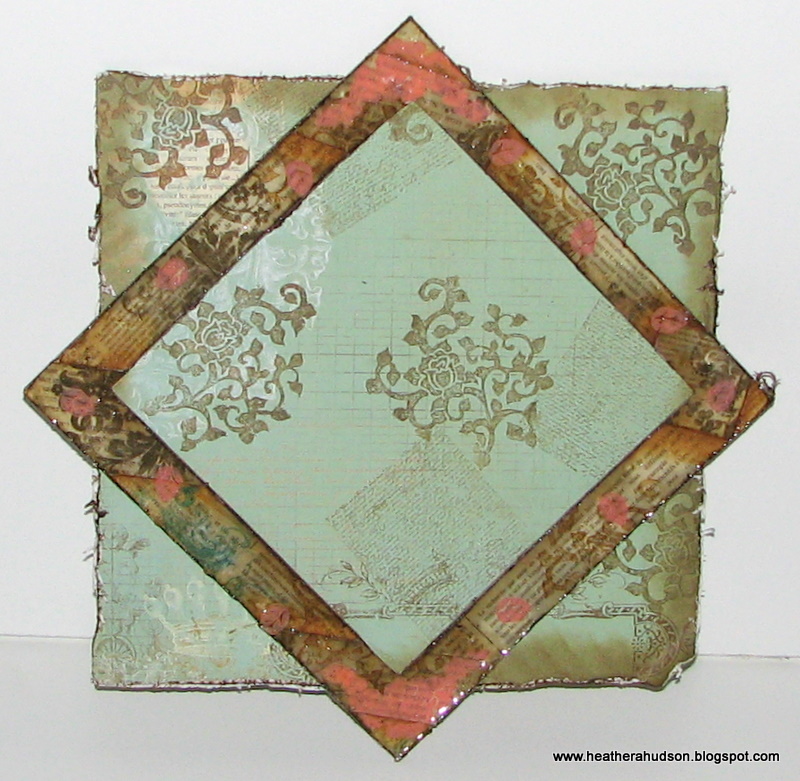
 I used a ruler and cut out a large square from the center to create a frame. I did the same thing to the piece left in order to create another frame. You can see this process below.
 Here is how I would like to use it.
 I took 1 inch strips of my pp and adhered it in different directions to the smaller diamond frame. I also used the stamp that came in the SD's kit to stamp on the blue pp along with my favorite background stamp that I carved myself (used Ranger's Vintage photo). I also used my Distrezed tool to distress all edges!
 I then inked the edges, stamped some of my hand carved stamped images on it, and then shaded with Spice brown (Delta acrylics) where the pieces overlapped to form even more depth. I then covered the whole piece with Perfect Medium and Utee.
 Next I started on the larger shaped frame. My background pp that has the stamp from the kit...before it is distressed.

 I used Americana Acrylic paint to basecoat the leaves and rose and also my Dusty Attic piece (further down in post). I then used Delta Forest green to shade the leaves, and Delta Flesh to shade the rose (and small round areas on the Dusty Attic). I applied Perfect medium to the whole frame and took a gazillion hours to cover it in Utee! Took FOREVER...but well worth it! I then used a perfect medium pen and did some free hand drawing around the edges and then applied perfect pearls in Perfect Copper. Gives the whole piece a really KEWL antique look
 Here is a photo of the Dusty Attic piece. I did all the shading with Spice brown by Delta, and then covered with UTEE (the photo is before I added the utee).

 I used a Martha Stewart punch (the flowers to the right of my photo), and used the same colors of paint to paint them. They too were covered in UTEE. The Butterfly and Dragonfly came from some Graphics Fairy images I used to create die cuts with my Silhouette SD (they are covered in Utee as well).
 I left these images large, so that you can click on them and make them bigger. I bought the fabulous trim from my local JoAnns.
One more shot of the full page!
 I made my boys sit for 20 pictures...lol...and this is the best one I was able to get. Craziness!
Thanks for visiting!
Hopes this inspires you do create!
Hugs!


Here is the larger frame covered with another piece of PP from my kit. I used one of my flower stamps (that I made) with Stazon in Jet black ink and drew a small rose and some leaves in the lower right corner, which I will paint to coordinate with the Gabrielle Papers by BoBunny.


Thank goodness I LOVE to paint! It turned out Fabulous! Goes Great with the Gabrielle line of PP! Once I covered it with Utee, I also used Ranger Liquid pearls in Bisque to add even more dimension. Here is a close up of the bottom Right. Pretty good photo of the DA and Frame details.


One more shot of the full page!

Thanks for visiting!
Hopes this inspires you do create!
Hugs!
This might be a fav for me! I would so be adding a sticky note to this one if I could. I love, love, love the colors and WOW all the detail work!!! Gorgeous! Nice pic of the boys too!
ReplyDeleteWow! This is amazing! All those details on one "piece of art!"
ReplyDeleteBeautiful as always!
ReplyDeletevery cool! good luck with the contest!
ReplyDeleteSo not FAIR!! I worked my butt off on my chippies to try and win this contest. If I lose to you it'll definitely be well deserved GF! Nice job.
ReplyDeletethis is just unreal gorgeous...so much art here!!!!!!! I LOVE IT!!!
ReplyDeletevery beautiful! labor intensive but looks like it was well worth it! Good luck!
ReplyDeleteHeather, I had to stop by your blog to see this amazing piece of artwork! I'm so glad you gave step by step details! Love it! Thanks for sharing! Mandy
ReplyDeleteWow, ornate and detailed...thx for the sharing the 'how to', Heather :) Love the colors!
ReplyDeleteMy mouth just fell open when I saw this. It is absolutely amazing!!!
ReplyDeleteWow, unbelievable! I found the process of how you created this so interesting. Thanks for sharing.
ReplyDelete