
***If you are visiting from the Graphic Fairy the freebie Frame image is located at the bottom of this post.***
I purchased these Fab Jenni Bowlin papers to create this beautiful layout for a Jenni Bowlin Challenge that my BF is having on her blog.
I can win a $10 gift certificate if I get enough votes....so if you are not busy....drop by her blog and post a comment saying you vote for Heather (me...LOL). You can vote until March 28th. Here is a direct link to the post
Place your vote here :-)
At the end of this post I have a Vintage Thank you image for those of you who took the time for vote for me! Hugs!

Here are some photos of this piece in the making


 Above are photos (stock photos) of the original papers.


I did some fussy cutting of the bird paper. I cut out part of the side lengths, and repositioned the upper right corner piece so it was pointing downward. I then placed it on top of the black paper. I cut out one inch strips of the red hounds-tooth paper. I distressed all edges using my cutterbee scissors, and Ranger's distress ink in Vintage photo.
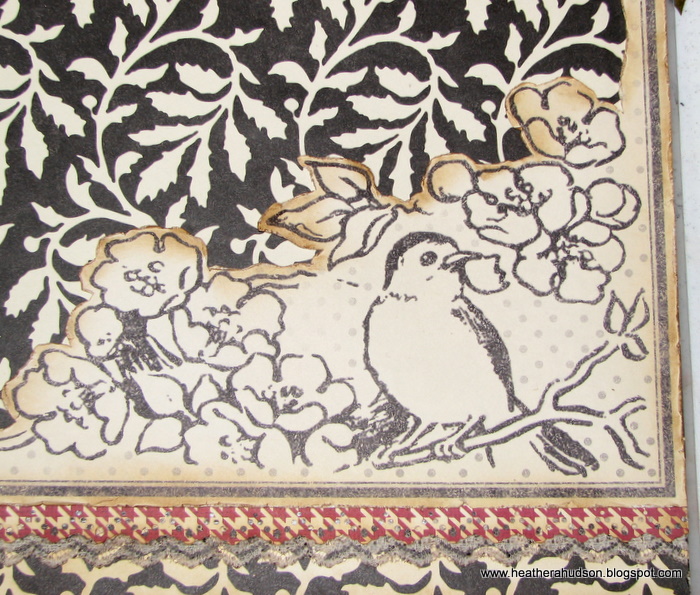
I used one of my punches to punch out the edges of the red paper. I layered it with vintage lace and the black/khaki background. Here you can see the bird and flowers before I painted them. The black background has not had the perfect pearls added yet either.

Here I started painting the leaves with forest green acrylics by Delta.


I started painting the flowers with Santa Red by Decoart.
I painted the bluebird with Delta's Norsk blue, the branches with Spice brown, and the centers of the flowers with Antique Gold. I used an angle shader by Lowell Cornell (7000 series), to shade all of my painting, to give it a water color effect and didn't want to cover the whole image. I also used a #2 Filbert brush to paint some extra leaves on the background. I also used this brush to paint leaves on the borders, and the circle piece that I added to the center circle (below).

I stamped the part of the circle that I know will show with a stamp I designed and carved using Vintage photo. I then painted the leaves over the top with forest green.

I added some decorator's trim from Joannes at the bottom of the page. I guess I did all the work with the lace and punched paper....for nothing...lol. That is what happens when you change your mind about something. I knew once I saw that green ribbon...it would be going at the bottom of the page.
 Here is the center circle in place. I used lace behind the circle. Here you can see that I painted some more green leaves on the sides...and the "Remember" acrylic piece by Heidi Swapp.
 I just place some plane beige paper behind this Heidi Swapp piece. Then inked it. :-) added the leaves.
 Here is a close up the top right in progress. I have that sweet little Heidi Swap Crown on my blue bird.
 I used my Perfect Medium pen to draw inside of the khaki color designs on the black background, then applied perfect pearls in perfect bronze.
 I inked the edges of the large Red Heidi Swap flowers with Ranger's Chipped Sapphire distress ink and then folded in half, and tucked under the "Remember" piece (which is elevated with pop dots). I then used Stickles in marigold to form a "center". I used beading wire in gold and added some beads to add some cool flower stamens.
 You can see the Tim Holtz pin that I added a blue bead and some clear beads too. A cross charm, and some red butterflies. The butterflies are Heidi Swap clear acrylic with a black herringbone pattern. I just simply painted the backs of all 4 of them with Santa Red paint. Then used my perfect medium pen and perfect pearls in perfect bronze on the front.
 Here you can see more of the butterflies. Look at that beautiful Dusty Attic piece in the Right corner. I used perfect medium on this and then embossed it with Old Gold embossing powder. I added some small crystal bling to the Dusty Attics too. The Prima white flower was spritzed with Heirloom gold perfect pearls mist...same with the small flowers to it's side.
The small pink and white flowers were created with my fiskar's tiny flower punch. I created them out of khaki cardstock and then shaded with the Santa red paint. I used stickles in marigold for the centers.
 Here is a close up of the crown on the bird which I applied the Perfect pearls. I added the sweet flower charm in the center and added some more painted leaves. There are some more of the tiny flowers I painted.
 Here you can see the larger red butterfly, and I forgot to mention that I did a layer of Lisa pink paint (Delta) on the blue bird's chest and then another layer of Santa Red. I also outlined the bird in perfect pearls
The pictures of my and my DH's parents were all cut out using my Silhouette SD (print and cut feature), at 2 inches. I used black card stock for matting which was cut out using the "off set feature" of my Silhouette Studio program.
 One last look at the finished piece.
Here is my Thank you Image
(I created this using graphic from Karen the Graphic Fairy)

If you double click, you will get the large image. Then you can right click and save.
This is a GIF file with a transparent background. I have a .jpg file if you need it instead. Just leave a comment.
Hugs!
Here is a jpg of the above transparent background image.
 Thanks!
Hugs!


The small pink and white flowers were created with my fiskar's tiny flower punch. I created them out of khaki cardstock and then shaded with the Santa red paint. I used stickles in marigold for the centers.


The pictures of my and my DH's parents were all cut out using my Silhouette SD (print and cut feature), at 2 inches. I used black card stock for matting which was cut out using the "off set feature" of my Silhouette Studio program.

Here is my Thank you Image
(I created this using graphic from Karen the Graphic Fairy)

If you double click, you will get the large image. Then you can right click and save.
This is a GIF file with a transparent background. I have a .jpg file if you need it instead. Just leave a comment.
Hugs!
Here is a jpg of the above transparent background image.

Hugs!
Absolutely BEAUTIFUL!
ReplyDeleteLove all the detail! Wish I knew how to paint and have it look like that! Love the beads on the TH pin, great idea! I have tons of those! Love those butterflies too! I am off to vote!
ReplyDeleteNever entered my mind to add beads to the TH pin...CLEVER girl. AWESOME painting, Heather. WOW...this is a visual feast! Hope you win!! xo
ReplyDeleteAbsolutely STUNNING!!!
ReplyDeleteHeather...seriously...this is BEYOND beautiful!!! Just loving the amount of detail and embellishing you have going on...you are a TRUE artiste, SO talented and I am honored to even be in a contest with you (AND feeling kinda silly but that's another story, hehehe! :-P) Thank you for visiting my blog and for the inspiration - hope to meet you IRL sometime soon! :)
ReplyDeletep.s. Thank you so much for your sweet comments about my Abby too! :) She enjoyed reading them too :)
ReplyDeleteGORGEOUS Heather!!
ReplyDeleteIt's gorgeous Heather!
ReplyDeleteThis is such a pretty LO! You really put a lot of love into it...Love it!
ReplyDeleteOh, my goodness! You are amazing in what you can do! You are very talented, and your work is beautiful.
ReplyDeleteAbsolutely gorgeous!
ReplyDeleteWow Heather, this is absolutely gorgeous!!!
ReplyDeleteGeorgeous frame. Thank you. Andrea
ReplyDelete